Custom Type Continuum Setup
On November 8, 2023, a new Resource Catalog Tool was introduced which changes the way custom resources are created. This section will cover the creation of a custom continuum resource. If you have questions or issues, please contact us through the NRAO Science Helpdesk.
Generate a Continuum Resource
If you prefer not to use an NRAO Default resource, for example for On-The-Fly Mapping observations, you may create a custom continuum resource in your personal catalog. These steps are applicable to wide band continuum resources for 8-bit and 3-bit instrument configurations. At any time you can click on the [?] icon to bring up a window with more information on the selected topic.
First, select the personal catalog/group you wish to create the resource in, then do the following to create an 8-bit or 3-bit resource.
FILE → CREATE NEW → INSTRUMENT CONFIGURATION
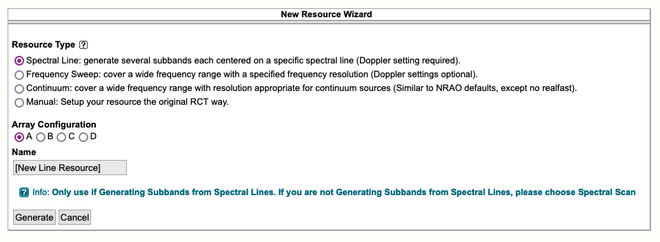
- You will then be presented with the New Resource Wizard (Figure 3.7). Here you can select the type of resource (see the other sections on spectral line, frequency sweep, or manual setups), the array configuration, and give the resource a name.
 |
|---|
| Figure 3.7: New Resource Wizard. |
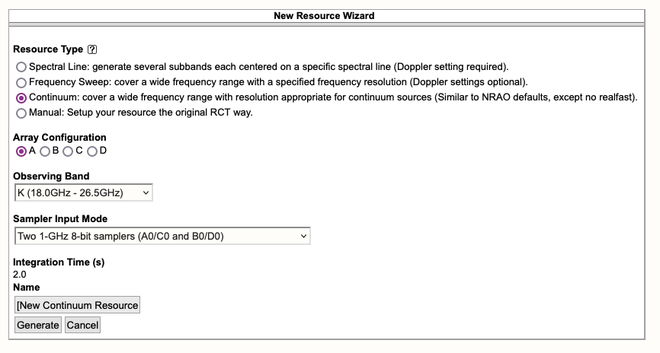
Once you select Continuum, the Wizard will expand as indicated in Figure 3.8 below to give you more options. If you click on the Generate button before the Continuum options become available then this session of the OPT will crash. If that happens, please contact the NRAO Science Helpdesk so that this session can be terminated.
 |
|---|
| Figure 3.8: Expanded Wizard for Continuum setup |
Here you will select the array configuration for the resource - this will adjust the Correlator Integration Time according to the NRAO default for that observing band. You can enter your desired value later. The Sampler Input Mode has two options: Two 1-GHz 8-bit samplers (A0/C0 and B0/D0) or Four 2-GHz 3-bit samplers (A1/C1, A2/C2, B1/D1, and B2/D2). Also specify a descriptive and useful name the resource. When all this has been done, click on the Generate button to create your new Continuum resource.
Important Note: After typing in any of the text fields, click somewhere else on the page (not in another field) to allow the entry to be applied (and saved to the data base) and always be patient when updating fields or navigating to different tabs.
BUG ALERT! If you happen to choose 4, 4/P, P or L band note that these bug have not yet been fixed; please fix them manually yourself to start with the NRAO Default setup:
| receiver band | issue | baseband center | subband centers |
| 4 (54-86MHz) |
subbands 24 MHz too high | already correct | reduce the subband center frequencies with 24 MHz (in B0D0), ie they should center on 72, 76 and 80 MHz |
| P (200-500MHz) |
subbands 96 MHz too high | already correct | reduce the subband center frequencies with 96 MHz (in A0C0), ie they should center on 232, 248, 264, 280, 296, 312, 328, 344, 360, 376, 392, 408, 424, 440, 456 and 472 MHz |
| 4/P (54-86MHz & 200-500MHz) |
same as 4 and P individually | already correct | reduce the A0C0 subband frequencies with 96 MHz and B0D0 with 24 MHz as noted for 4 and P band individually above |
| L (1.0-2.0GHz) |
garbled setup |
A0C0 to 1.264GHz, B0D0 to 1.776GHz |
Delete all subbands in both basebands A0C0: create 8 subbands of 64MHz wide with subband centers of 1040, 1104, 1168, 1232, 1296, 1360, 1424 and 1488 MHz B0D0: create 8 subbands of 64MHz wide with subband centers of 1552, 1616, 1680, 1744, 1808, 1872, 1936 and 2000 MHz |
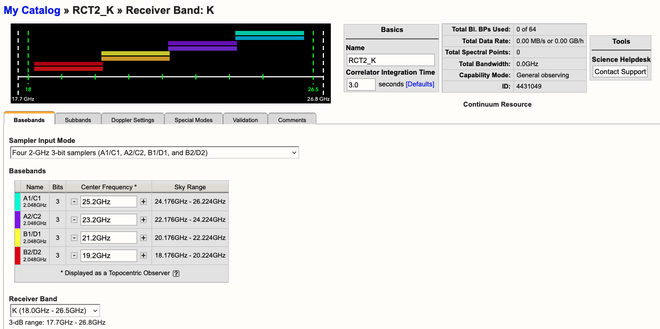
A new 3-bit K-band continuum resource has been generated (Figure 3.9).
 |
|---|
| Figure 3.9: K-band resource created by Wizard. |
8/3-bit Tab Information
Now that you have generated an 8/3-bit resource, we will walk you through the general layout of the tabs. With this knowledge, you will also be able to create a wide band continuum or frequency sweep resource. To create a spectral line resource, refer to the Spectral Line Resources section for a more detailed guide.
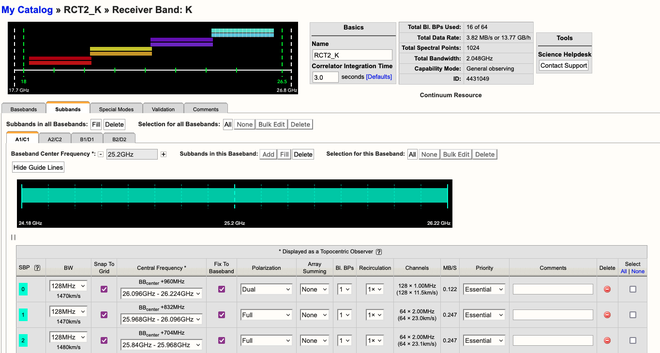
For both 8/3-bit instrument configurations you will see a graphical visual of the basebands at the top of the screen and under the Subbands tab. In addition, there is an information box located at the top right indicating the total Bl. BPs used, total data rate, total spectral points, total bandwidth, and capability mode, i.e., General Observing or Shared Risk. Figure 3.7 (above) is an example of the information you will be presented at the start of creating an 8-bit resource. Note, all completed actions made while working on a resource are automatically saved.
Basics Information Table
Near the top you will find the Basics info table (Figure 3.10) were you can change the name of the resource and the correlator integration time.
|
Figure 3:10 Continuum Basics info table. |
Below is a description of the parameters in the Basics table.
| Name |
This should be distinctive from other resources and match the name of the corresponding resource used in the proposal. Do not use special characters and it is probably best to keep the name relatively short. |
| Correlator Integration Time (seconds) |
The correlator integration time would have been set when the resource was initially created by selecting one of the array configurations. This can be modified in the table if you do not wish to use a default setting or if the default is no longer correct once the observing band has been determined. For more details, refer to the Time Resolution and Data Rates section of the Observational Status Summary (OSS). |
| Total Bl.BPs Used |
This indicates the total baseline board pairs (BlBPs) used, which is a measure of the required correlator resources. The starting number will always be zero and will increase as lines and continuum subbands are added and when additional baseline board pairs are stacked on a line. The maximum number of available baseline board pairs is 64. |
| Total Data Rate |
The data rate of the resource will increase with shorter correlator integration times and as lines and continuum subbands are added. Keep in mind the minimum and maximum data rates listed at Time Resolution and Data Rates. |
| Total Spectral Points |
The total number of spectral points will increase as the number of requested BlBPs increases. The number of spectral points in a subband is the product of number of channels, number of polarizations and number of baseline board pairs. The total here is the sum over all subbands. For a more detailed explanation, refer to the Recirculation vs Baseline Board Pairs section of the OPT manual or the Spectral Line Resources section. |
| Total Bandwidth (GHz) |
This will display the sum of all subband bandwidths across all basebands in GHz. This sum has no correction for overlapping subbands but note that overlapping subbands do not physically add to increasing continuum sensitivity. |
| Capability Mode |
This will display the capability mode of a resource, e.g., general, shared risk, or resident shared risk observing. This will depend on the total data rate and certain other settings described in the OSS. |
| ID |
This is the unique resource identification number. |
| Contact Support |
Selecting this button will allow you to contact the NRAO Science Helpdesk while silently supplying data specific to this resource to the ticket. |
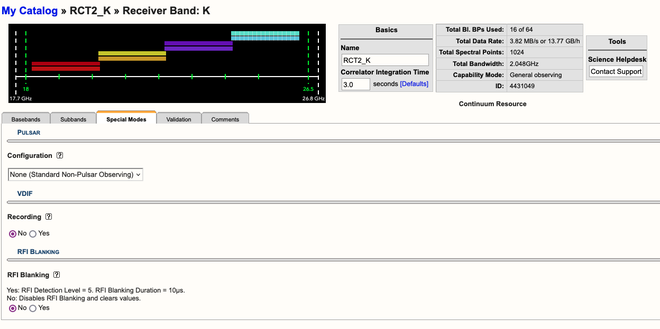
Below is the description of each tab element / page in the resource.
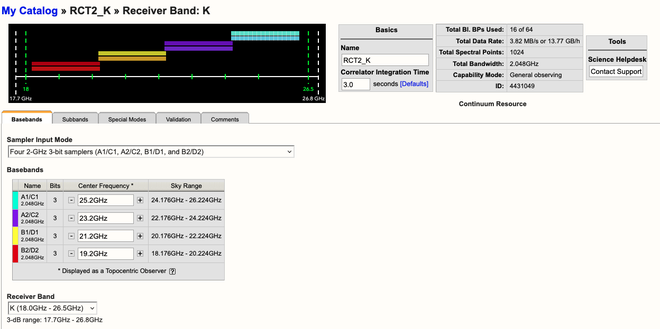 |
| Figure 3.11 Baseband Tab (click to enlarge) |
| Tab | Description |
|---|---|
| Basebands |
|
 |
| Figure 3.12 Subbands Tab (click to enlarge) |
| Tab | Description |
|---|---|
| Subbands |
|
 |
| Figure 3.13 Special Modes Tab (click to enlarge) |
| Tab | Description |
|---|---|
| Special Modes |
|
 |
| Figure 3.14 Validation Tab (click to enlarge) |
| Tab | Description |
|---|---|
| Validation |
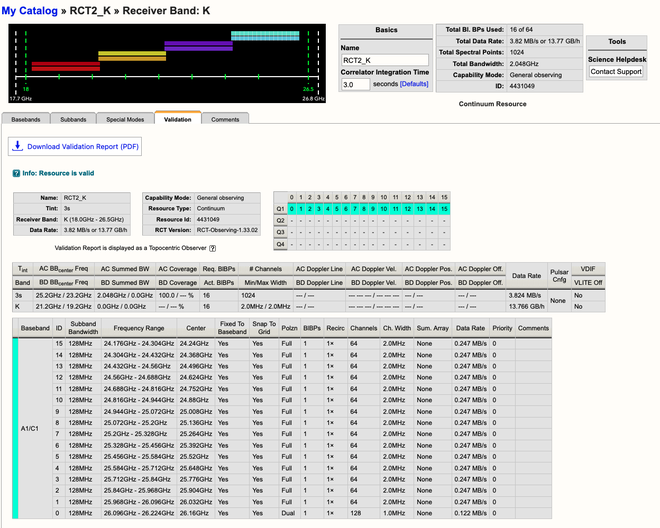
This tab shows a summary of the instrument configuration you have created, a table of the Subband Grid Boundaries, and a table of the BlBPs in the correlator quadrants. If there is a problem with the resource, a warning or error message will appear in the interface feedback strip at the bottom. |
 |
| Figure 3.15 Comments Tab (click to enlarge) |
| Tab | Description |
|---|---|
| Comments |
This tab shows an entry field where you can add comments to your resource. Note that this comment field |
Always double check your proposal to make sure your custom resource follows what you proposed to do.
If there is a need to modify the existing resource, after generating a resource and attaching it to scans in an SB in the OPT, rename or copy it to a new name and make the modifications in the resource with the new name. This adjusted resource has to be re-attached to the scans in the SB, replacing the faulty resource. The easiest way to do this is with the Bulk Edit Scans tab on the selected SB. Having a different name for the two resources is extremely useful in checking whether the edit was successful and whether scans with the old resource have been overlooked.


