The OPT Suite
Introducing the Tools
To access the OPT Suite, go to the NRAO User Portal. You will be required to login or create an account. If you have forgotten your password, you may reset it, if you have forgotten both username and password, please create a new account to contact us via the NRAO Science Helpdesk. Do not use the registration owned by someone else.
After logging in to the NRAO User Portal, click on the Obs Prep tab at the top. This will redirect you to a dashboard containing a link to Login to the Observation Preparation Tool (OPT). Note you may also access the OPT Suite directly by using this url: https://obs.vla.nrao.edu/opt. In the web application you will see a menu bar (above the white line) and a navigation bar (below the white line) (see Figure 1.2.1). The web application opens to the OPT (labeled as Observation Preparation). You can also navigate to the SCT and RCT in the navigation bar using the links labeled Sources and Instrument Configurations, respectively. We have tried to keep the editing concepts as similar as possible across the three tools.
 |
|---|
|
Figure 1.2.1: OPT Suite menu and navigation bar. |
The OPT Suite is a web application written in JAVA. This allows us to keep an up-to-date production version for all users. However, this can also cause slowness since it is actively connecting and interacting with the NRAO database. For the best performance, we recommend using Firefox as the web browser. The OS of your computer should not matter. After a certain amount of inactivity the web application will time out; however it will auto-save any changes made. To exit gracefully go to File and choose Exit, or find the Exit button at the top right. Please do not exit the tool by closing the web browser or browser tab before exiting properly, with either of the exit options, as this will keep your session active and will create problems accessing your project for some hours.
The most important rule when working in the OPT Suite: be patient. When you click on something or enter information into a field it may take a few seconds to connect back and forth between your browser and the NRAO database. Please avoid clicking or entering before the previous action was completed. Be patient and watch the busy icon of your browser to stop (and sometimes even a bit longer). If you continue to have problems, contact us through the NRAO Science Helpdesk.
The SCT, RCT, & OPT
The SCT (https://obs.vla.nrao.edu/sct), labeled as Sources in the navigation bar, is used to specify a collection of telescope pointing directions, i.e., a source position on the sky from which the user can select when creating a list of scans in the OPT.
The RCT (https://obs.vla.nrao.edu/rct), labeled as Instrument Configurations in the navigation bar, is used to specify a collection of hardware and instrument configurations from which the user can select when creating a list of scans in the OPT.
The OPT (https://obs.vla.nrao.edu/opt), labeled as Observation Preparation in the navigation bar, is used to setup an observation, i.e., a Scheduling Block (SB), by creating a list of scans containing sources, resources, and scan intents. Each scan consists of a source position (selected from the SCT) using a specific hardware and instrument configuration (selected from the RCT) combined with an observing mode action lasting for a time interval, and for a specific reason (scan intent(s)).
Projects, Program Blocks, & Scheduling Blocks
The OPT contains three levels:
- Project level contains the project code (e.g., 20A-001 or SF1234), the PI, co-I’s, and total allocated time.
- Program Block (PB) level contains hours allocated to a specific array configuration (e.g., A, B, C, D, or Any) in the allocated observing semester and observing priority (e.g., A, B, or C), and Execution Block(s) (EB) once an observation has been run (successfully or unsuccessfully).
- Scheduling Block(s) (SB) are created within the PB and can be linked using the conditional format system (to be described in more detail in the OPT section).
The Project level will consist of at least one PB and within the PB will contain any number of SBs created by the observer. Typically a PB does not extend to another observing semester. For example, if you were allocated time for the A-configuration and B-configuration, then one PB will be defined for the A-configuration and one for B-configuration, perhaps in a following semester. You may also find PBs for the same array configuration but with time allocations split over different observing priorities.
SBs may be many different snippets of an observing run, i.e., groups of consecutive scans that constitute a complete observation totaling the allocated time. Or an observing run may also be defined in a single SB. In both examples, the observed SB(s) would complete the allocated time within a specific PB. These observing methods would depend on what the user finds appropriate for their science and observing priority.
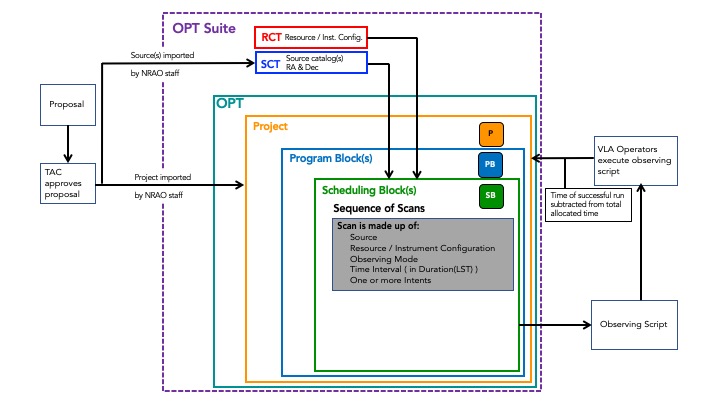
The Flow of an Approved Proposal to Observed SBs Explained (Figure 1.2.2):
After a proposal has been submitted, reviewed, and approved by the Time Allocation Committee (TAC), NRAO staff import the project into the OPT about a month before the start of the allocated configuration. During this process, the source list provided in the Proposal Submission Tool (PST) will be imported into the SCT. In the future, this will happen for resources supplied in the PST as well, but for now they have to be created in the RCT by the user.
In the RCT you may use the NRAO default resource(s) or create your own resource(s) that you proposed to set up. Inside the project you will find the Program Block(s) (PB) allocated by configuration (A, B, C, D, or Any) and inside the PB, you will find a starter scheduling block (SB) that you may use to create your SB(s).
An SB is a series of scans. A scan is comprised of: a source imported from your personal source catalog or from the VLA Calibration Catalog; a resource / instrument configuration imported from your personal resource catalog or from the NRAO default resource catalog; an observing mode; a time interval in Duration(LST); and one or more observing intents. Once you have created the SB and it passes the first stage of validation to where you can submit it, the data analysts (DAs) will perform a secondary validation of the SB for items such as correct wrap, missing scans, incorrect intents for the scan, etc. When an SB has passed this second and more intensive validation, it will be approved for observation.
When an SB is approved, it is converted from human-readable scans to a machine-readable file (the observing script). This script is then executed by the VLA Operator based upon certain criteria such as the weather constraints (wind and atmospheric phase limit (APL)), observing priority, and other factors. When the observation is successful, the duration of the SB is subtracted from the total allocated time. If for some reason the observation is aborted or failed due to issues with the correlator, array, or weather, the time is not counted against the total allocated time. There are some circumstances where we will not fail an observation if the problem lies in how the SB was setup outside of our recommended guidelines.
 |
|---|
|
Figure 1.2.2: Schematic flow diagram of approved proposal to observed SBs. |
Tool Layout
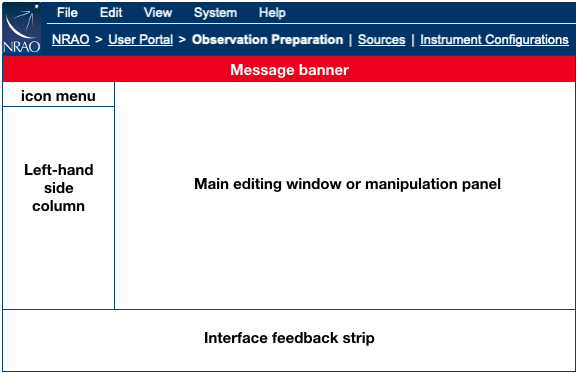
After logging in to the OPT Suite via the NRAO User Portal, you will be presented with the OPT from where you can navigate to the SCT and RCT (see Figure 1.2.1). Each of the tools will display a menu bar and a similar navigation bar at the top. If the tool name is bold with no underline, then that is the current tool in use. The underlined tool names can be accessed by clicking on the name, e.g., Sources and Instrument Configurations (as shown in Figure 1.2.3). In addition to the menu and navigation bar, the OPT Suite is organized with an icon menu, a left-hand side column, a main editing window or manipulation panel, and an interface feedback strip at the bottom. Since each tool is utilized for different purposes, they will each display different information in the panels. More information on using the menu bar items will be discussed in later sections.
 |
|---|
|
Figure 1.2.3: Basic layout of the OPT Suite panels. |
The interface feedback strip is the small panel at the bottom of the OPT Suite. This panel is used to display feedback information such as error messages (red font) and warning messages (blue font) generated when entries made through the web interface are validated. It is advised to pay attention to these messages as it may be the only indication that an SB or resource is faulty. An SB with errors cannot be submitted, but an SB with warnings may be submitted if the observer persists. Please note that the interface feedback strip will include a scroll bar and a button (See All Messages for this Scheduling Block) when there are more warnings and errors to display than fit directly on the visible part of the panel. Clicking on the button will allow you to more easily read the error and warning messages.
Occasionally you may encounter a red message banner just below the navigation bar. We use this banner to convey anticipated downtime, emergency software updates, etc., suggesting you to postpone or finish your work promptly. On this banner, you will see a small ‘x’ to the right of the message. If you click on the ‘x’ it will close the banner until you log back into the OPT. For small computer screens, i.e., laptops, this message banner can get in the way of allowing you to import (re)sources into a scan.
The left-hand column (Figures 1.2.4.a-c) will vary depending on which tool is selected.
 |
 |
 |
| Figures 1.2.4.a-c: Left hand columns for the three tools (SCT, RCT, and OPT) | ||
- SCT: At the top of the left hand side column of the SCT, below the icon menu, is an interface to search for sources. The source search is performed on a source name only in the selected source catalog (highlight it by clicking) in the list of catalogs in the bottom part. Alternatively, the source is queried from the SIMBAD database when the external search field and button are used. Check the alias box if you have not entered the name of the source in the selected catalog, e.g., its 3C name. Use Advanced Search if you want to search on something else than a source name in a single catalog, e.g., using a cone search on a position with a flux density limit.
- In the bottom part of the left hand side column of the SCT, there should be at least one source catalog visible in red italics, named VLA that contains the VLA calibrators also in red italics (indicating it is read-only); these catalogs are sorted by RA groups, Dec groups, and VLA Flux Calibrators. There may be other source catalogs visible, e.g., catalogs that you have defined yourself. Small plus-sign icons indicate there are groups of sources defined within a catalog; click on it to expand and display these groups. The VLA catalog also contains subgroups that can be expanded.
- RCT: At least one group of resource catalogs should be visible in the resource catalog column, the NRAO Defaults in red italics (indicating it is read-only). The NRAO Defaults catalog contains the hardware/instrument configurations
- interferometric pointing scans to be utilized for high frequency observing (greater than 15 GHz). (Note, only the NRAO default, X-point (formerly known as X-band pointing), resource should be used for the interferometric pointing scans.)
- 3-bit resources with up to 4 Basebands at 2 GHz bandwidth
- 8-bit resources with up to 2 Basebands at 1 GHz bandwidth
- Alternative resources for A- and B-configuration to reduce the effect of microwave link RFI
- Slew dummies scans for slewing antennas at the start of an SB
- Other resource catalogs may be visible, e.g., a Personal Catalog or any that were previously defined or shared.
- OPT: The left-hand column of the OPT should contain the project for which you were awarded observing time. If the project is not there, please let us know as soon as possible using the NRAO Science Helpdesk. The project is typically entered about a month before the allocated configuration and a readiness email will be sent by the VLA scheduling manager (schedsoc) notifying that the project is available. Other projects may be visible, in particular if you had previous observing programs or if you were awarded observing time for more than one project in this proposal round. Different icons in the tree depict different items: P for projects, PB for program block, SB for scheduling block. When using this for the first time, it may only show the Project; a project tree would be visible all the way to the first scan level with consecutive mouse clicks on the item names in the tree. Some of the information may have been entered from the details of your proposal and should be read-only.
- A small plus-sign icon in front of a project or catalog means that there are items defined within that item; click on it to expand and display a tree-view of these items. For example, clicking on a plus-sign icon in front of a project will expand a list of PBs in that project. Clicking a small minus-sign icon will collapse all content within that item. For speed and memory reasons, not all projects are loaded into memory from the start. If the plus-sign is not visible with the project or SB you would like to work on, simply click the project name to load it into memory.
- At the top of the left-hand side window, there is an icon menu. These icons can be used to cut (delete) or copy and paste specific SBs, individual scans, (re)source catalogs, or (re)source groups. The options of this icon menu act only on the items in the tree, not on the items in the main editing window. In contrast to the small icons in front of a tree item, plus-sign and minus-sign icons in the icon menu expand or collapse the tree under a selected (highlighted) item. Arrow icons move items around in a tree. Navigating between projects, PBs, SBs, and scans in the OPT is simply done by selecting (click to highlight) any such item name in the tree. Similarly, you can navigate between a tool’s catalogs and groups in the left-hand side column trees (in the SCT and RCT).
More on manipulating PBs, SBs, and scans in the OPT, manipulating (re)source catalogs and (re)source groups, and using the source search tool will be discussed in later sections.
The main editing window, or manipulation field, exposes different information fields per tool and per item type. However, the SCT and RCT at first instance will both show a very similar table of catalog contents, i.e., a table of entries in the selected catalog or group.
- SCT: Selecting a source catalog or group within a source catalog will show the sources in this catalog or group in the form of a table listing in the main source manipulation field. If the list contains more than 25 sources, this list will occupy multiple pages, which can be browsed using the page selection buttons at the top and bottom of this table in the main window. Instead of 25, a higher number can be selected (at the top of the table) to show more entries per page. The source table contains a source per row with a check box, an editing icon (Edit Source), a field for the source name, the coordinates, and other details. The coordinate frame used for display in the table is listed above the source table, and may be re-selected. Hovering the mouse over the items in the Details or Aliases column pops up additional source information when available. Finally, clicking on the Sky Map icon opens a new browser tab with detailed information on the sky and VLA calibrator sources surrounding up to ten degrees around the position of that source.
- RCT: A selected resource catalog or group within a resource catalog shows a similar table listing in the main resource manipulation field, but now with resources. Again, initially there are up to 25 entries per table (i.e., per page) shown, and the different pages are navigable using the buttons at the bottom. The resource list contains a resource per row with a check box, an editing icon, a field for the resource name, frequency band, correlator integration time (Tint), AC/BD bandwidth, AC/BD center frequencies, back-end of the resource (WIDAR correlator), and a field for user comments.
- OPT: When a project is selected (highlighted), the main project manipulation field will show the details of this project (and PB, SB, or scan details on underlying levels). Most of this upper level information has been transferred from the PST or entered by NRAO staff, in particular the total allocated observing time. Investigators not on the original proposal but involved in the observing or data reduction can be added to the project at any time. The information in this OPT window will be different according to the item that is selected on the left-hand side. If a PB is highlighted, information on array configuration, observing priority, and underlying SBs appear, with the time allocated to that PB. When SBs are executed, the execution block (EB) table summarizes the dynamic scheduling starting conditions. The information on selecting an SB is spread over four pages, each accessible via its own tab at the top of the main window: Information (with SB name, count, LST start range, conditions, and comments to the operator), Reports (with resource, source, and scan summary listings), Validate & Submit, and Executions. There is also a Bulk Scan Edit tab that will be explained later. Selecting a scan deploys another couple of tabs in the main editing window.
More on manipulating block and scan information, or on manipulating (re)source information can be found in later chapters.


Connect with NRAO