Create a New Source
If you do not use the PST upload file and your source does not appear in any of the existing catalogs, you will need to create a new source in a source catalog (or group) after selecting (or creating) the catalog or group you want to place the source in:
FILE → CREATE NEW → CATALOG/GROUP (if the catalog/group does not already exist)
FILE → CREATE NEW → SOURCE (in the desired catalog/group)
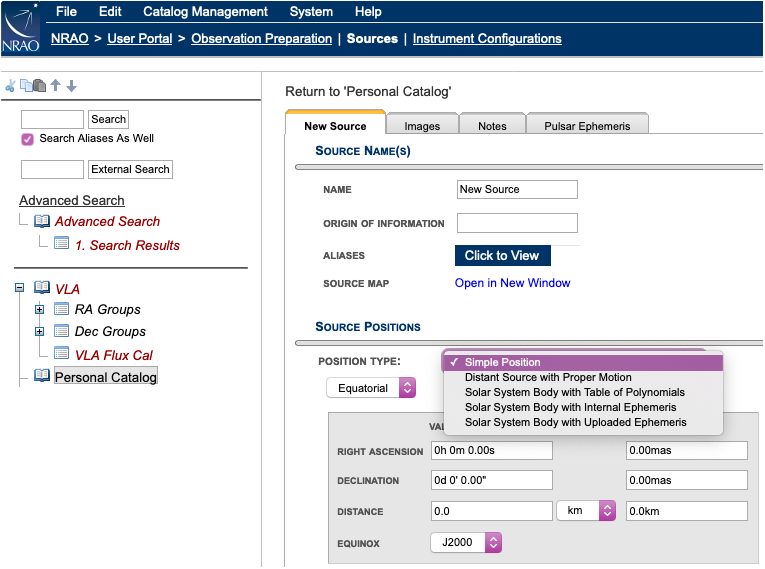
You will be presented with a blank source page consisting of four tabs labeled New Source, Images, Notes, and Pulsar Ephemeris (Figure 2.4.1). Name your source something convenient to search for at a later point, and fill in the necessary details (described below). You may also care to fill in the origin of your data for your own reference (e.g., PST file name, SIMBAD data base, etc.).
Source Positions
The SCT allows five different types of positions to be entered (Figure 2.4.1):
- Simple Position
- Distant source with Proper Motion
- Solar System Body with Table of Polynomials
- Solar System Body with Internal Ephemeris
- Solar System Body with Uploaded Ephemeris
By default the first option in the drop-down menu is Simple Position. Select a coordinate system (Equatorial, Galactic, or Ecliptic) and equinox (only J2000 should be used) in which you specify the coordinates and, if you care, also supply a distance (if known).
 |
|---|
| Figure 2.4.1: New Source information. |
If you select something other than Simple Position, the new selection will redraw the position table accordingly with all variables defaulted. You can select a predefined Solar System body name, upload an ephemeris table, or you can specify the position and some motion terms valid for some time range.
Motion terms are entered as polynomials, one for RA and a separate one for Dec, in time and are assumed to be representing the actual position for a certain time interval ("valid" box at the bottom):
position at Reference Time in Equinox + value(1) × time + value(2) × time2 + value(3) × time3, etc.
where the RA/Dec of the source at some point in time (defined in the "reference time" in the box below it) functions as the starting point of the polynomial. You would have to enter a "motion term" explicitly as, e.g., "3.4 x time - 0.5 x time2" (where "x time" may be abbreviated by "t", i.e., "3.4t - 0.5t2" and where "t2" is entered as "t^2"). Note that a value without a "t", "t2", etc, attached to the value will not be accepted. When imported as a source in a scheduling block in the OPT it should already show the position as for the date put in the reports tab; this will be updated at the time of actual observing. As the proper motion is given in actual angle (on a big circle), be aware that the motion in RA is calculated along the celestial equator, regardless of Dec, meaning that a proper motion in RA will yield the same RA-coordinate for a source at Dec=0d or e.g., Dec=60d. That is, there is no "cos(δ)" projection-term in the RA-coordinate change.
The motion term units and uncertainty will help recalculating the position (and error) at the time of observations, though this is currently not yet fully tested. Leave the motion terms blank if the source is considered not to move in the specified time interval. If you need another position and/or different motion terms for another time interval, simply add another time interval or add another source with a different name and position to the catalog and use it as appropriate. More information, in particular about generating ephemeris files, is given in the Observing Guide under Moving Objects.
Always double check the correctness of the source positions before searching for appropriate calibrators and before creating SBs.
Source Information
Images tab (Figure 2.4.2-4) displays the Visibility Chart consisting of three plots:
- an elevation plot of the source as function of LST (Figure 2.4.2);
- a polar coordinate plot of the source as a function of Azimuth vs. Elevation as a function of LST (Figure 2.4.3);
- and the azimuth of the source as function of LST (Figure 2.4.4).
Adjacent to the plots are tables of rise and set LST (at 8° elevation) and some other elevation/azimuth and LST properties for your reference. Below are Image Links. It allows you to keep a catalog of image URL links, e.g., to the images in the VLA archive; use ADD or REMOVE SELECTED as many times as desired.
 |
|---|
| Figure 2.4.2: Example of J0416-1851 Elevation curve in the Images tab in the SCT. |
 |
|---|
| Figure 2.4.3: Example of J0416-1851 Azimuth and Elevation curves in the Images tab in the SCT |
 |
|---|
| Figure 2.4.4: Example of J0416-1851 Azimuth curve in the Images tab in the SCT |
Notes tab is where you can collect all other information you wish to attach to this source. For example, for a target source you can remind yourself of the nearby calibrators you have found to be useful at some frequency, a reference to a paper mentioning an alternate position or a source property, or anything else you want to note. Click the blue expand button or New Note to add information to the Notes field. You can add links to papers or any other URLs for that matter. User defined values can be added at the bottom, e.g., the UV-range you determined to be proper for a point source calibration model, or whatever you deem useful.
Pulsar Ephemeris tab Certain VLA pulsar observing modes (binned imaging, and phased-array fold mod) require a pulse period ephemeris file be attached to the source. A Tempo-format ephemeris (also known as a "par file") for the source can be uploaded via this tab. Refer to the pulsar section in the VLA observing guide for more information.


Connect with NRAO