Introduction
To access the Observation Preparation Tool (OPT), login directly to the OPT Suite URL: https://obs.vla.nrao.edu/opt. Note, to exit the tool properly, use the Exit link in the upper right corner or log out with FILE → EXIT; do not close the browser window/tab.
By the time you have reached this section of the OPT manual, you should have a populated source catalog (either personal or project related generated for you by NRAO staff) and a resource catalog populated with a custom resource create by you (or a colleague) and/or perhaps a copy of an NRAO default resource. In order to create a scheduling block (SB), you must first know the sources (science target(s) and calibrators) and resource(s) you wish to use in your observation in order to define the scans within the SB. It is useful to outline the project in terms of the program block (PB) and SBs in advance. Use information from the proposal, etc. (refer to General Guidelines) and create (re)source catalogs with only the subset of (re)sources that will be used in the SB you are about to create. Having your (re)sources in small personal catalogs is convenient and faster than having large catalogs or switching back and forth between your personal catalog(s) and, e.g., the VLA catalog. Check the remaining (re)sources for correctness before you continue.
The purpose of the OPT is to combine a source from one of your source catalogs with a resource from one of your resource catalogs, and to specify an observing mode, a time interval, and an intent for this combination. Repetitive combinations will build an observing schedule that defines an SB which may be executed by VLA operations. The sequence of scans in an SB will appear in the left-hand side column in the project tree and in the Schedule Summary on the Reports tab.
The most important rule when working in the OPT: be patient. When you click on something or enter information into a field it may take a few seconds to connect back and forth between your browser and the NRAO database. Please avoid clicking or entering before the previous action was completed. Be patient and watch the busy icon of your browser to stop (and sometimes even a bit longer).
If you have any questions, you may either submit your questions through the NRAO Science Helpdesk, request help directly from the OPT by selecting HELP → CONTACT SUPPORT, or if you have already created a scheduling block (SB) you may request help from the Validation and Submission tab. Note, if you request help from the Validation and Submission tab of an SB the project code and SB ID will be included in the subject line.
Left-hand Column
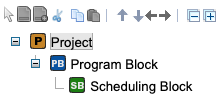
On the left-hand column of the OPT, you will see an icon menu at the top. If this is your first time using the OPT there will be nothing below the icon menu or you may see an accepted project (Figure 4.1.1).
 |
|---|
| Figure 4.1.1: Left-hand column of OPT. |
The OPT contains a collection of projects. Projects are subdivided in a tree of program blocks (PBs), each subdivided in scheduling blocks (SBs), which each contain scans and/or loops of scans. This column, per SB, contains the scan list, i.e., the column represents the observing schedule. In contrast to the SCT and RCT, much of the editing in the OPT will be performed in the left-hand side column as well as in the main editing window.
Icon Menu
The icon menu in the OPT has more options than in the SCT and RCT. The icons in-common have the same functionality as the icons in the SCT and RCT, but as more editing is done in the left-hand side column some extra icons (with their fly-over help tool-tip) are added. Only icons valid for the selected or highlighted items (e.g., PB or scan) are displayed. A full list of icons and their meanings is shown in the listing below. These icons do not apply to the main editing window, only to the Project tree items.
| Click to allow multiple selections for cut/copy/paste | |
| Add a new (blank) scan | |
| Add a new scan (with copy of source and hardware only) | |
| Cut (delete) selected tree item | |
| Copy selected tree item | |
| Paste selected tree item | |
| Icon menu separator (no action) | |
| Move selected item up by one in current tree level sequence | |
| Move selected item down by one in current tree level sequence | |
| Promote selected item up, above the current tree branch (out of loop) | |
| Demote selected item down, in the next current tree branch (into loop) | |
| Icon menu separator (no action) | |
| Collapse/hide all items in the selected tree | |
| Expand/show all items in the selected tree |
SB Validation Icons
New icons have been added to the OPT at the SB level indicating when an SB, scan, loop, or subarray is invalid or not validated. When the OPT validates an SB or a scan, this does not necessarily indicate that the SB is valid for observing. The VLA data analysts will still perform their validation check of all submitted SBs before approval.
| This overlay indicates the SB, scan, loop, or subarray contains invalid information. | |
| This overlay indicates the SB, scan, loop, or subarray has not been through the internal validation process of the OPT. | |
| This overlay indicates the SB, scan, loop, or subarray has a questionable setting that the internal validation is reporting. |
Note that based on the various themes the icons will appear a little different than below, which is using the Standard Light theme.
| SB Icons | Scan Icons | Loop Icons | Subarray Icons | ||||
| valid | valid | valid | valid | ||||
 |
error |  |
error |  |
error |  |
error |
| not validated | not validated | not validated | not validated | ||||
 |
warning |  |
warning |  |
warning |  |
warning |
Menu Strip
The OPT has many menu strip options. Some of the options are only accessible when editing certain items, i.e., PBs, SBs, and scans.
| File | Edit | View | Help |
|---|---|---|---|
|
Create New → Test Project → Program Block → Scheduling Block → Scan → Before → In → After → Scan Loop → Before → In → After → Subarray → Before → After |
Cut Project Copy Project Paste → Paste Before → Paste Into → Paste After To Durations Unroll Loop
|
Hide/Unhide Projects Theme
Font Size → Large → Medium → Default
|
About the OPT About Me New Features Documentation Contact Support
|
|
Refresh Project Import Project... Import Scheduling Block... Import Scans... |
|||
|
Export Project Export Scheduling Block Export Scans Export Catalogs... |
|||
|
Exit |


Connect with NRAO