Scan Modes and Special Observing Modes
Interferometric Pointing (IP)
Interferometric pointing (a.k.a., reference pointing) may be needed at frequencies of about 15 GHz and higher (K, Ka, Q-band, and most Ku-band setups). At these frequencies the antenna pointing accuracy (a few arcseconds) becomes a significant fraction of the primary beam. Observing with an inaccurate pointing thus may degrade the signal by a significant fraction. The antenna pointing is a function of the shape of the reflective surfaces and is influenced by, amongst other things, gravity and temperature. Therefore, observing at high frequencies may require regular pointing scans to determine offsets from the pointing model. These pointing offsets remain reliable for target sources within about 20d in AZ or EL from the pointing position. Therefore, typically an observation would redetermine pointing solutions when moving to a different portion of the sky, or roughly hourly when tracking a (group of nearby) target source(s).
Pointing scans are performed as a five-point raster observation on a strong (over 300 mJy) continuum calibrator, in first instance in X-band continuum. This primary reference pointing scan usually yields sufficiently accurate pointing offsets, but if more accurate solutions are required a secondary reference pointing may follow at the (standard) frequency of the observing band. Secondary pointing is also performed in continuum mode (to be as sensitive as possible to the continuum source) in an attempt to improve the antenna pointing in the band of interest. However, local lore is that although this might improve the pointing a bit toward the pointing source, subsequent slews and with time passing by, this secondary pointing in general does not yield a long lasting improvement on the primary pointing. In addition, there is the risk that for some antennas the secondary solution fails. The resources for secondary pointing scans are available, but it is debatable whether the extra time spent to perform a secondary pointing scan is worthwhile. Determining pointing solutions using spectral line sources, e.g., with SiO masers in Q-band, has not been tested.
Default pointing resources are included in the NRAO defaults catalog in the group Pointing setups. You may want to copy the X-point (formerly known as the X band pointing) resource and pointing sources you wish to use from the standard catalogs to your personal catalog.
Setting Up an IP Scan
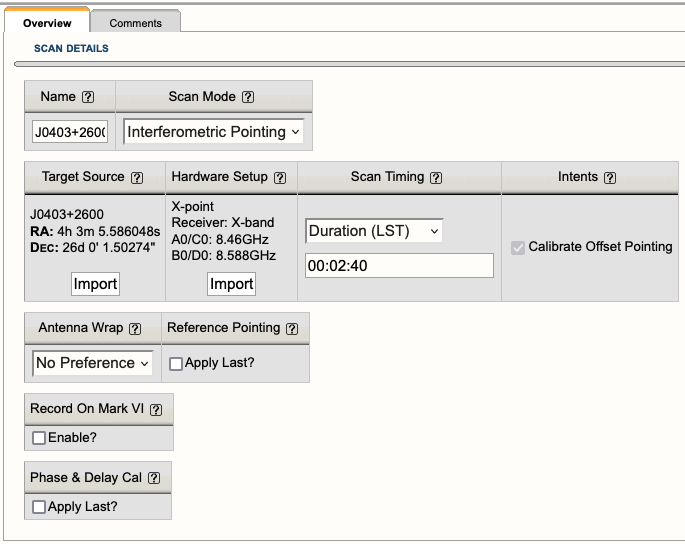
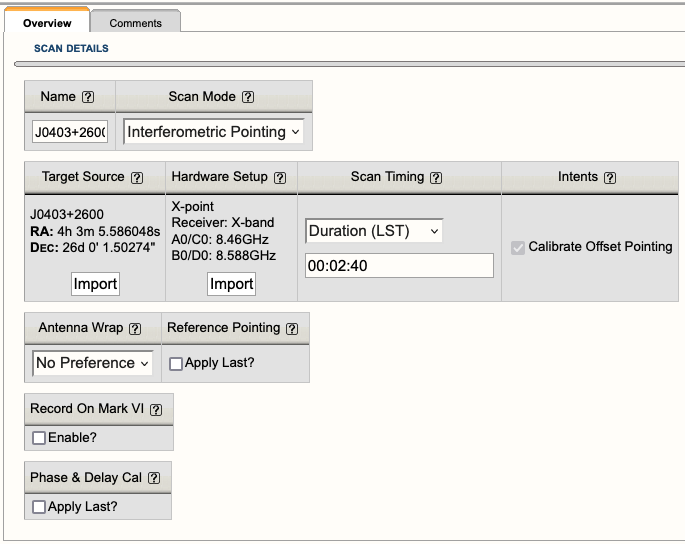
To utilize the interferometric pointing scan mode, select Interferometric Pointing from the drop-down menu under the scan mode section of a scan (Figure 4.9.1a). These scans should use a long enough scan duration (in LST) to include an on source time of at least 2min 30sec. It is advised to start a block of high frequency observations with a pointing scan, and tick the apply reference pointing for each scan thereafter. This tick-box will apply the offsets that were determined in a previous pointing scan; if you forget you will be using the (most likely less accurate) default pointing model. Your first calibrator scan (after the setup scans) may be a pointing scan, but as you don't know in what AZ the array starts, you should allow for ample slewing time or anticipate a worst case scenario using the AZ starting conditions on the Reports tab.
 |
|---|
|
Figure 4.9.1a: Example of an Interferometric Pointing scan used in an SB. |
If the pointing scan has not finished by the stop-time of this scan, no valid solutions can be applied. If it has determined a pointing solution before the stop-time has been reached it will continue with another five-point raster, which may or may not yield new solutions (which will be averaged with the first raster solutions). For secondary reference pointing scans, apply the solutions of the preceding primary reference pointing scan.
A pointing scan is for real-time calibration and, while very useful for real-time calibration, usually does not yield useful data for your project. The data is included in the observations, however, you will need special input parameters to load the data in your data reduction package (CASA or AIPS). You may study this data for reference, but the real-time corrections are already applied and cannot be undone.
Tipping (TIP)
Important Note: Currently tipping scans are discouraged since neither CASA or AIPS can apply the results of the tipping scans to the data.
Tipping scans may be needed if you are concerned about calibrating the absolute flux density of your science target source(s). The atmosphere absorbs some of the radiation, and the fraction of the absorbed radiation depends on the opacity, the transparency of the atmosphere. It is mainly dependent on the content of water vapor between the target source and the antenna(s), and can be derived from a series of system temperature measurements at various elevations. An observer would redetermine the opacity on the time scale in which significant changes are expected, i.e., the time scale in which the water vapor content of the atmosphere above the telescopes changes. This is a strong function of baseline length and actual weather and no real guideline on time scales is available.
Tipping scans are performed toward an AZ direction close to your sources at about the observing frequency. The scan samples elevations between about 20 and 60 degrees for a system temperature and can be directed from top to bottom (down) or from bottom to top (up). When you select an AZ for your tipping scan, be aware that shadowing may occur, especially in C and D-configurations. Avoid the AZ directions of the arms, i.e., avoid measuring tips close to the AZs of -5, 56, 115, 175, 236, 295, 355, and 416 degrees.
Setting Up a TIP Scan
To utilize the tipping scan mode, select Tipping from the drop-down menu under the scan mode section of a scan (Figure 4.9.2a). Tipping scans are set up using one of your resources and probably are best done with the widest bandwidth available; make a new resource if you need it. You do not need a physical source. The total duration (LST) of a scan should include the required on source time of 1min 50sec for a tip scan to complete (in one direction, up or down). At the bottom of the page you will have to set the AZ and direction; do not forget this as otherwise you will be slewing to the default AZ of 0d (North) and may hit an antenna wrap constraint/limit. Hitting an antenna wrap limit, can consume half an hour of your observing time to return to your science observing, so always set the AZ.
| Figure 4.9.2a: Example of a Tipping scan. |
You may place any number of tipping scans anywhere in your schedule as you feel fit to monitor the opacity during your observations, although you may want to do this close to your block(s) of high frequency observations. The first scan following the setup scan(s) may be a tipping scan, but as you don't know in what AZ the array starts, you want to allow for ample slewing time or anticipate a worst case scenario using the AZ starting conditions on the Reports tab.
If the tipping scan has not finished by the stop-time of this scan, the data will contain those elevation samples that were completed. If it has completed the tip before the stop-time, it simply will continue with the next scan until the regular stop-time for that scan — this scan may be used to buffer the difference, e.g., absorb the extra time on your bandpass calibrator.
A tipping scan is for post-observation calibration and may or may not yield useful data for your project. The data is included in the observations and you need special switches to load the data in CASA or AIPS. A "tip" would allow you to determine the opacity of the atmosphere during the tipping scan (i.e., during your observation), and you can use that value to correct for the atmospheric absorption in your data.
On The Fly Mapping (OTF)
On the fly mapping or on the fly mosaicking (OTF) scans are different from other scan modes as the data is actually taken with the telescope moving in a scanning motion between two points on the sky. This move is done in a linear fashion with a constant speed with respect to the sky. Note that there currently are two different ways to interpolate over major circles on the sky: one uses Equitorial coordinates (OTFE scans) and the other uses Galactic coordinates (OTFG scans) in the OPT - this is a simple Interpolation Mode toggle in the Scan Mode. Regardless which one is used, the starting and ending coordinates (RA and Dec or Long and Lat) are given in the OPT scan, and the telescope moves in the given stripe direction (see below) at a constant speed linearly in RA/Long and linearly in Dec/Lat. Due to the sky's natural sidereal motion with respect to the telescope, OTF scans from east to west and west to east in principle require different absolute telescope slewing rates seen by the operator, but the slewing rate on the sky is not affected by the direction of the slew. The scan duration, the number of phase center steps, and the number of visibility dumps per integration determine the interpolation mapping grid and map sensitivity as discussed on the mosaicking page of the Observing Guide. Note that these OTF slews are using the Mercator projection of the coordinates in RA/Long and Dec/Lat and therefore might have map deformation implications for OTF close to the (north) Celestial/Galactic pole.
For the remainder of this section it is assumed that the observer has consulted the guidelines given in the mosaicking page, and that the phase center grid and integration time per pointing are known. As OTF modes typically are used to cover a large area of sky in a short time, the default resource integration times are likely to be too long for OTF observations. How to set up an Equatorial OTFE resource is described further below; setting up a Galactic OTFG resource is identical when Long and Lat are substituted for RA and Dec, respectively.
To observe in OTF mode, the OPT needs to know both the beginning and end points of the OTF scan in J2000 Right Ascention (RA) and Declination (Dec) or in Galactic Longitude (Long) and Galactic Latitude (Lat). The scan from the beginning to the end point is referred to as a "strip" or "stripe". Per strip these two boundary target positions must be defined in the source list (SCT) as two distinct sources. The intermediate phase centers for the mapping between the beginning and end points are determined by the on-line system as described below. These intermediate points are not displayed in the Reports tab of the SB, only the boundary positions. Of course these boundary target points can be entered in the SCT manually, but for any larger (rectangular, hexagonal, etc) grid mosaic, by far the easiest way to define sources in the SCT is to generate the grid of boundary points (e.g. pairs of RA values with each pair having the same Dec) using a text editor and to import this grid with the text import tools given under the Source Lists section of Text Files and Catalogs in the OPT. Some examples are given below; boundary points provided in coordinates other than equatorial will be converted to J2000 RA and Dec internally by the SCT (i.e., also for the Galactic coordinate version, but this will be opaque to the observer).
Setting Up an OTF Scan
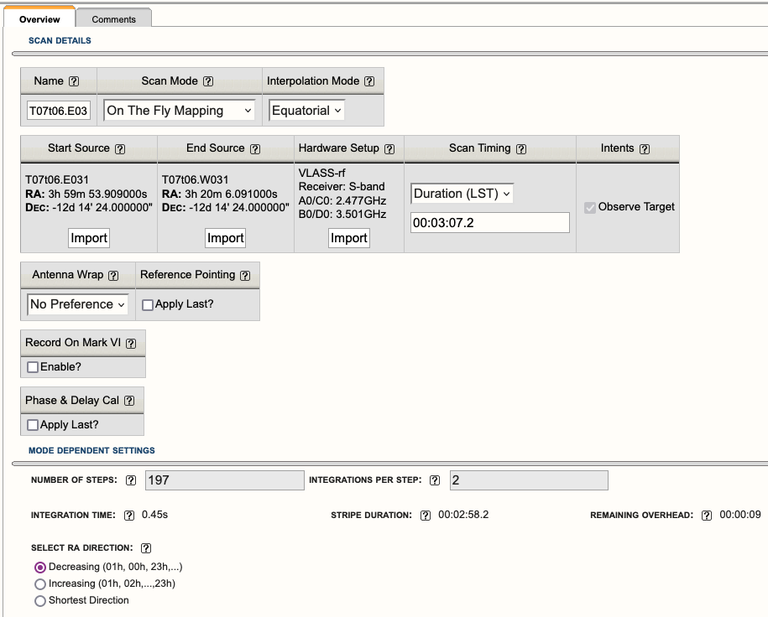
To utilize the OTF scan mode, select On The Fly Mapping from the drop-down menu under the scan mode section of a scan (Figure 4.9.3a). For stripes interpolated in the J2000 frame, leave the default Interpolation Mode as Equatorial. Switching to the Galactic interpolation mode instead will do the same as the Equatorial version with the difference that it will interpolate in Galactic coordinates - the rest is essentially the same and therefore the below will only highlight the Equatorial version. Selecting this scan mode reveals the required fields to schedule an OTF strip. These fields are not only the beginning and ending position of the strip (as defined above), but also some specific settings for defining the strip. The number of steps and the integrations per step both require user input. The value for integration time is provided from the selected "hardware setup" resource, whereas the stripe duration is equal to the number-of-steps-plus-one multiplied by the number-of-integrations-per-step, then multiplied by the integration time. The plus-one is added to the number of steps to account for the time required for the telescope to reach the appropriate constant speed. (The telescope actually begins its motion from just beyond the boundary point, in order to be in motion at the appropriate scanning speed from the starting point for the OTF scan. The time for this speed build-up results in an extra "step" that will be flagged in the visibility data). Note that the stripe duration is not the same as the scan timing duration. The latter should include at least 10-15 seconds of additional overhead to position the telescopes for the beginning of the strip (e.g., to include turn around and settle time) and thus somewhat depends on the angular distance to slew between the observed strips.
 |
|---|
|
Figure 4.9.3a: Example of an OTFE scan from a VLASS scheduling block. |
|
OTFE Mode Dependent Settings |
|
|---|---|
|
Number of Steps (variable N) |
The strip is divided linearly in N-1 equal parts between the RA end-points, and similarly in Dec, and thus contains N pairs of (RA,Dec), including the end points. These coordinates will constitute the phase centers used during the strip observation and end up as the "sky target positions" (or mapping grid points) of the data taken along the strip in the visibility data set. Each of these RA,Dec coordinates (fields) can be individually imaged if desired, or selectively included in joint deconvolution algorithms. |
|
Integrations Per Step (variable M) |
This is the number of time intervals associated with each phase center, i.e., each RA,Dec coordinate above. If individually imaged, the total integration time per field is M*Tvis (see next) and thus a measure for the image sensitivity (but see the mosaicking page for more accurate details). |
|
Integration Time (Tvis) |
This is the integration time per visibility as specified in the resource selected in the resource field. |
|
Stripe Duration (Tstrip) |
The time it will take to complete this strip observation. The time includes the extra startup integration for the strip (i.e., N+1 steps), but excludes the overhead time for slewing the telescopes to the starting location for the strip. This number is calculated as: Tstrip = (N+1)*M*Tvis |
|
Scan Timing (Tscan) |
The total time of the scan, input by the user, which must account for the Stripe Duration time plus slewing overhead from the previous telescope location (e.g. the end source of the previous scan) to the starting location for this scan. The slewing overhead should include at least 10-15 seconds if the scan is the continuation of a previous strip pattern (e.g., a reversal of the motion at the next strip in the same area of the sky), but otherwise may need significantly more extra time if it is the first strip of a new mosaic (e.g., if the previous scan was on a complex gain calibrator or some other source that is not part of the OTF scanning). Therefore this number should be at least Tscan > Tstrip + 10sec. See the scan import example below. |
|
Remaining Overhead |
This value is equal to "scan timing" minus the "strip duration", and thus reports the additional overhead time for the scan. Observers should ensure that this value is at least 10-15 seconds in order to allow for slew time from the end of the previous scan to the start location for this OTF scan, as well as to allow for settling time. |
|
Select RA Direction |
Moving between two positions on the sky can be done in several ways: decreasing in RA, increasing in RA, or the shortest direction. The default is to choose the shortest direction in RA (and always the shortest direction in Dec). However, the direction of motion in the RA direction can be explicitly selected using the radio buttons here. Of course, when going the long way instead of the short route, the on-the-sky slew rate calculation below should use the strip angle of the longer path. |
The on-the-sky slew rate is determined by the strip angle (in arcmin or arcsec) and the stripe duration (in minutes or seconds), where the maximum tested slew rate in S-band currently is of the order of 10 arcmin per second, which is the same as 10 degrees per minute:
slew rate = (Change in angle)/(N*M*Tvis)
As for standard scan modes, the data rate is determined by the resource details. That is, as determined by the amount of correlator capacity used and by the dump time (Tvis). The resource summary in the RCT will show this number when creating the resource, and the reports summary page top table will also summarize it. Note that for the typically short integration times used in OTF, the data rate quickly will approach or exceed the limits set for General Observing Capability modes.
Create an OTF Resource
The main difference between a normal observing scan resource and an OTF resource is that typically the visibility dumps should occur at a faster rate than the potential smearing effects on the data. It is thus advisable to dump at least a few times while the telescopes move a primary beam on the sky, say Tvis(sec) <~ 0.1 x freq(GHz) / slew-rate(arcmin/sec), but this is dependent on the required sensitivity and science goal. Detailed guidance is provided in the mosaicking page of the Observing Guide
The resource can be created as described in the OPT RCT section, with the visibility integration time entered in the first tab. However, care should be taken not to exceed the current data rates (shown in the box in the RCT), which happens easily with demanding correlator setups as well as with shorter integration times.
Current constraints:
- Phase centers (N) cannot be changed faster than at 0.5 second intervals.
- Visibility integration (dump, Tvis) times must be at least 250 ms (which would be the integration time in the RCT).
- Resource data rates may not exceed the limits for (Resident) Shared Risk as stated in the current OSS.
- Limited slew rates in Azimuth (40 deg/min) and Elevation (20 deg/min) will pose a limit on the maximum slew rate in RA and Dec, depending on geometry (and LST) of the observation. It is best to stay on the safe side of these limits.
Additional Notes
- Slewing at high elevations should be minimized due to potential tracking and dish deformation issues close to zenith. That is, for OTF targets close to 34 deg Dec, map well before or well after transit, i.e. close to rise or set!
- When scanning in Galactic coordinates being close to Dec 34o may not be obvious; check your Declinations!
- Times for dumps are in UTC (which is very close to LST for Tvis << 1 min), scan times are in LST.
- Individual antennas may start and stop scanning a strip up to 0.5 seconds late with respect to the rest of the array. This discrepancy will introduce a pointing offset of up to 0.5(sec) x slew-rate for that antenna. To limit imaging problems without flagging such antennas as bad (where one may known which antennas were affected), observers should keep the offset smaller than about 1/4 of the primary beam FWHM, as calculated at the highest frequency in the observing band, when planning for potential slew-rates.
- See mosaicking page for Tvis and other mosaicking hints.
Examples
Suppose we observe in X band and follow the mosaicking web page to get the sampling distances in Equatorial coordinates, i.e., we assume an observing frequency of 9.33 GHz and hexagonal packing at sqrt(3) which is almost the same as using the upper part of the band and sqrt(2). The primary beam is thus 4.5 arcmin (270 arcsec) and we use a strip separation of 2.6 arcmin (156 arcsec). Remember that (ΔRA in angle) is (ΔRA in time) multiplied by 15 × cos(Dec), e.g. 4min at 60d = 4min x 15'/min x cos(60d) = 30 arcmin; similar for Galactic coordinates where ΔLong is multiplied by cos(Lat).
The minimalistic SCT input files then may look like this (see text-file input):
1a. A 20-arcmin length, 4-row (10' wide) rectangular area scanned in RA (constant Dec) centered on (J2000) RA=12:00:00, Dec=00:00:00
row01west ; ; ; ; 11:59:20; +00:03:54; ; ; ; ;
 row01east; ; ; ; 12:00:40; +00:03:54; ; ; ; ;
row02west ; ; ; ; 11:59:20; +00:01:18; ; ; ; ;
 row02east; ; ; ; 12:00:40; +00:01:18; ; ; ; ;
row03west ; ; ; ; 11:59:20; -00:01:18; ; ; ; ;
 row03east; ; ; ; 12:00:40; -00:01:18; ; ; ; ;
row04west ; ; ; ; 11:59:20; -00:03:54; ; ; ; ;
 row04east; ; ; ; 12:00:40; -00:03:54; ; ; ; ;
1b. A 20-arcmin length, 4-row (10' wide) rectangular area scanned in RA (constant Dec) centered on (J2000) RA=12:00:00, Dec=+60:00:00
row01west ; ; ; ; 11:58:40; +60:03:54; ; ; ; ;
 row01east; ; ; ; 12:01:20; +60:03:54; ; ; ; ;
row02west ; ; ; ; 11:58:40; +60:01:18; ; ; ; ;
 row02east; ; ; ; 12:01:20; +60:01:18; ; ; ; ;
row03west ; ; ; ; 11:58:40; +59:58:42; ; ; ; ;
 row03east; ; ; ; 12:01:20; +59:58:42; ; ; ; ;
row04west ; ; ; ; 11:58:40; +59:56:06; ; ; ; ;
 row04east; ; ; ; 12:01:20; +59:56:06; ; ; ; ;
2. A 7-point (3-row, ~8' diameter) hexagonal scanned in RA (constant Dec) centered on (J2000) RA=12:00:00, Dec=00:00:00
row01west ; ; ; ; 11:59:49.6; +00:02:36; ; ; ; ;
 row01east; ; ; ; 12:00:10.4; +00:02:36; ; ; ; ;
row02west ; ; ; ; 11:59:39.2; +00:00:00; ; ; ; ;
 row02east; ; ; ; 12:00:20.8; +00:00:00; ; ; ; ;
row03west ; ; ; ; 11:59:49.6; -00:02:36; ; ; ; ;
 row03east; ; ; ; 12:00:10.4; -00:02:36; ; ; ; ;
3. A 14-point (5-row, ~13' diameter) hexagonal scanned in RA (constant Dec) centered on (J2000) RA=12:00:00, Dec=+60:00:00
row01west ; ; ; ; 11:59:39.2; +60:05:12; ; ; ; ;
 row01east; ; ; ; 12:00:20.8; +60:05:12; ; ; ; ;
row02west ; ; ; ; 11:59:18.4; +60:02:36; ; ; ; ;
 row02east; ; ; ; 12:00:41.6; +60:02:36; ; ; ; ;
row03west ; ; ; ; 11:58:57.6; +60:00:00; ; ; ; ;
 row03east; ; ; ; 12:01:02.4; +60:00:00; ; ; ; ;
row04west ; ; ; ; 11:59:18.4; +59:57:24; ; ; ; ;
 row04east; ; ; ; 12:00:41.6; +59:57:24; ; ; ; ;
row05west ; ; ; ; 11:59:39.2; +59:54:48; ; ; ; ;
 row05east; ; ; ; 12:00:20.8; +59:54:48; ; ; ; ;
Example SB
An example of an SB that can be created with a text editor and imported in the OPT using the third example, may look like this (see explanation of the fields):
# example SB for OTF in equatorial coordinates on W51
#
VERSION; 3;
#
# rectangular Equatorial-OTF in S band, 8 strips, 0.5s
#
# define catalogs in which Sources and Resources can be found by name
 SRC-CAT; OTF, VLA;
HDWR-CAT; OTF, NRAO Defaults;
# Scheduling Block details
SCHED-BLOCK; OTF_W51_S; Dynamic; 1; 2014-06-07; 16:00:00-21:00:00 ; 25.0; D; 225.0; 35.0; N; N; w=100.0,p=60.0; ;
#
# startup scans on calibrators
 STD; Dummy; 3C286_S; S16f_otf_0.5; DUR; 1m; cw; N; N; N; N; SetAtnGain,; ;
 STD;3C286;3C286_S; S16f_otf_0.5; DUR; 9m; cw; N; N; N; N; CalFlux, CalGain, CalBP; ;
#
# Slew to calibrator close to mapping area
# slew from calibrator to beginning point of mapping row 1
# first 4 rows of map
 STD;J1925_S; J1925_S; S16f_otf_0.5; DUR; 6m; ; N; N; N; N; CalGain,; ;
 STD;Setup01; row01left; S16f_otf_0.5; DUR;35s; ; N; N; N; N; ObsTgt,; ;
 OTFE; row01; row01left; row01rght; S16f_otf_0.5; DUR; 144s; 32; 8; 0; ; N; N; N; N; ;
 OTFE; row02; row02rght; row02left; S16f_otf_0.5; DUR; 144s; 32; 8; 0; ; N; N; N; N; ;
 OTFE; row03; row03left; row03rght; S16f_otf_0.5; DUR; 144s; 32; 8; 0; ; N; N; N; N; ;
 OTFE; row04; row04rght; row04left; S16f_otf_0.5; DUR; 144s; 32; 8; 0; ; N; N; N; N; ;
#
# Slew to calibrator
# slew from calibrator to beginning point of mapping row 5
# next 4 rows of map
# final calibrator scan
 STD;J1925_S; J1925_S; S16f_otf_0.5; DUR;95s; ; N; N; N; N; CalGain,; ;
 STD;Setup05; row05left; S16f_otf_0.5; DUR;35s; ; N; N; N; N; ObsTgt,; ;
 OTFE; row05; row05left; row05rght; S16f_otf_0.5; DUR; 144s; 32; 8; 0; ; N; N; N; N; ;
 OTFE; row06; row06rght; row06left; S16f_otf_0.5; DUR; 144s; 32; 8; 0; ; N; N; N; N; ;
 OTFE; row07; row07left; row07rght; S16f_otf_0.5; DUR; 144s; 32; 8; 0; ; N; N; N; N; ;
 OTFE; row08; row08rght; row08left; S16f_otf_0.5; DUR; 144s; 32; 8; 0; ; N; N; N; N; ;
 STD;J1925_S; J1925_S; S16f_otf_0.5; DUR;95s; ; N; N; N; N; CalGain,; ;
#---END---
Solar (SOL)
The Solar (SOL) observing mode is only utilized for a solar target, that is a location near or on the solar disk. This section will focus on how to setup solar source(s) in the SCT and how to use the SOL scan mode in the OPT. For more details on solar observing and how to setup a solar SB in the OPT, refer to the Solar Observing section of the Observing Guide.
Create a Solar Source
Before creating the observation, the observer must first create solar source(s) in the SCT. Since the Proposal Submission Tool (PST) cannot anticipate the solar target of interest, the observer’s source will not appear in any existing catalog and the observer must create one under the SCT.
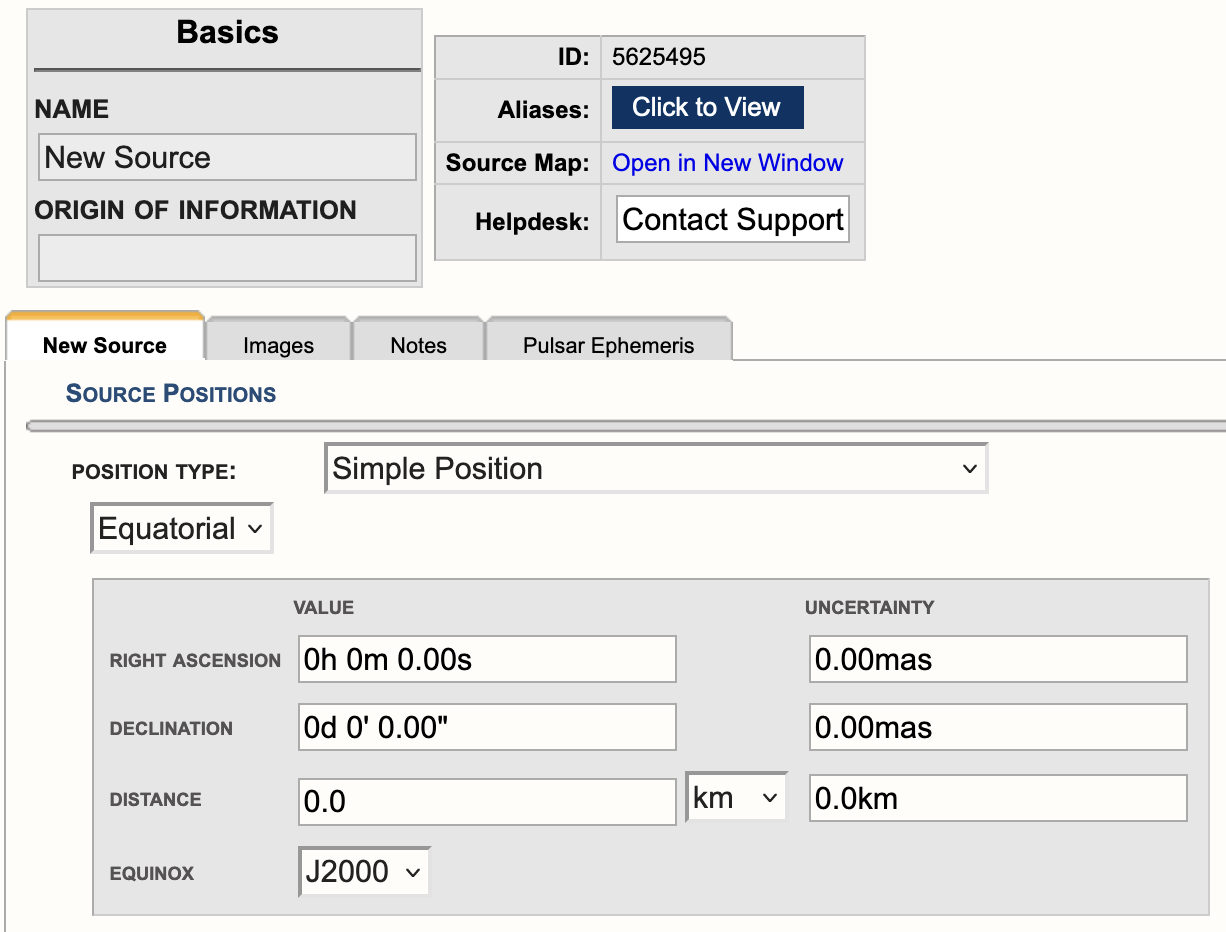
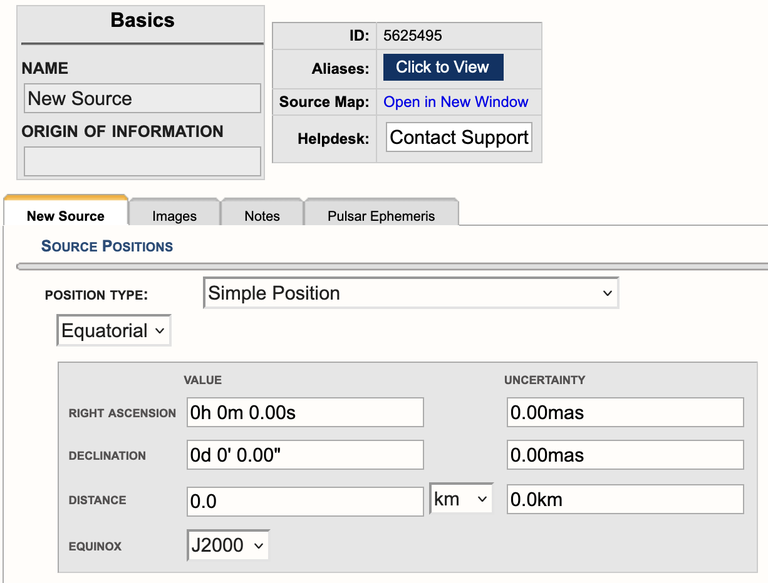
To add a source to the catalog, click on FILE → CREATE NEW → SOURCE (see Figure 4.9.4a).
 |
|---|
|
Figure 4.9.4a: Screen cap of a new source in the SCT. |
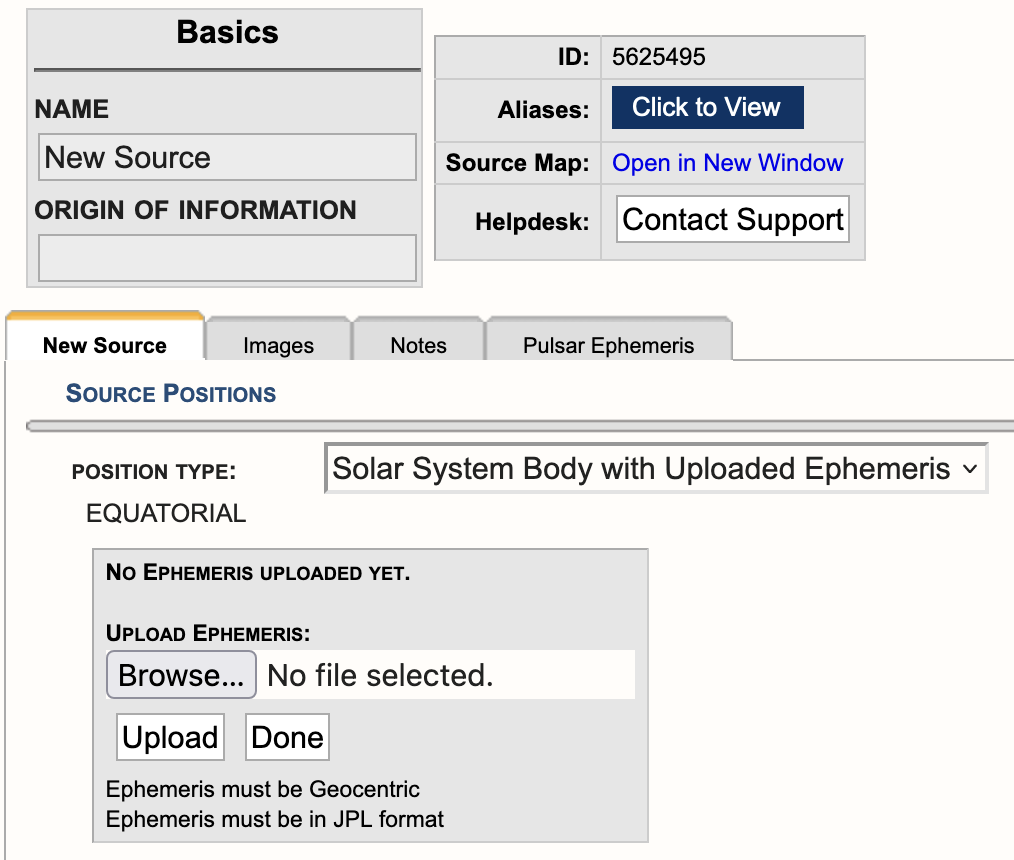
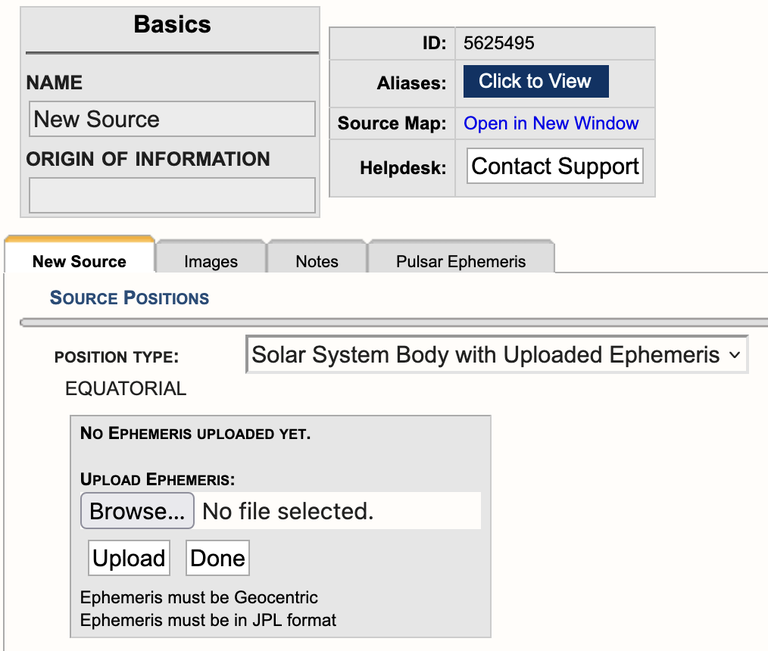
Under the Source Positions field click on the pull-down menu to the right of Position Type and select Solar System Body with Uploaded Ephemeris (see Figure 4.9.4b). For more information regarding the ephemeris, refer to the Solar Observing section of the Observing Guide.
 |
|---|
|
Figure 4.9.4b: Screen cap of new source position type Solar System Body with Uploaded Ephemeris. |
Click on Browse to select a solar target ephemeris and then click Import. Note that the ephemeris must be geocentric and must be in JPL format. Enter a Name for the ephemeris target and, if necessary, repeat the process to enter additional targets into the catalog.
Setting Up a Solar Scan
Now that you have created the solar source(s) for the observation and assuming the resource has also been created in the RCT per the approved proposal. The next step is to create a solar observing scan in the SB.
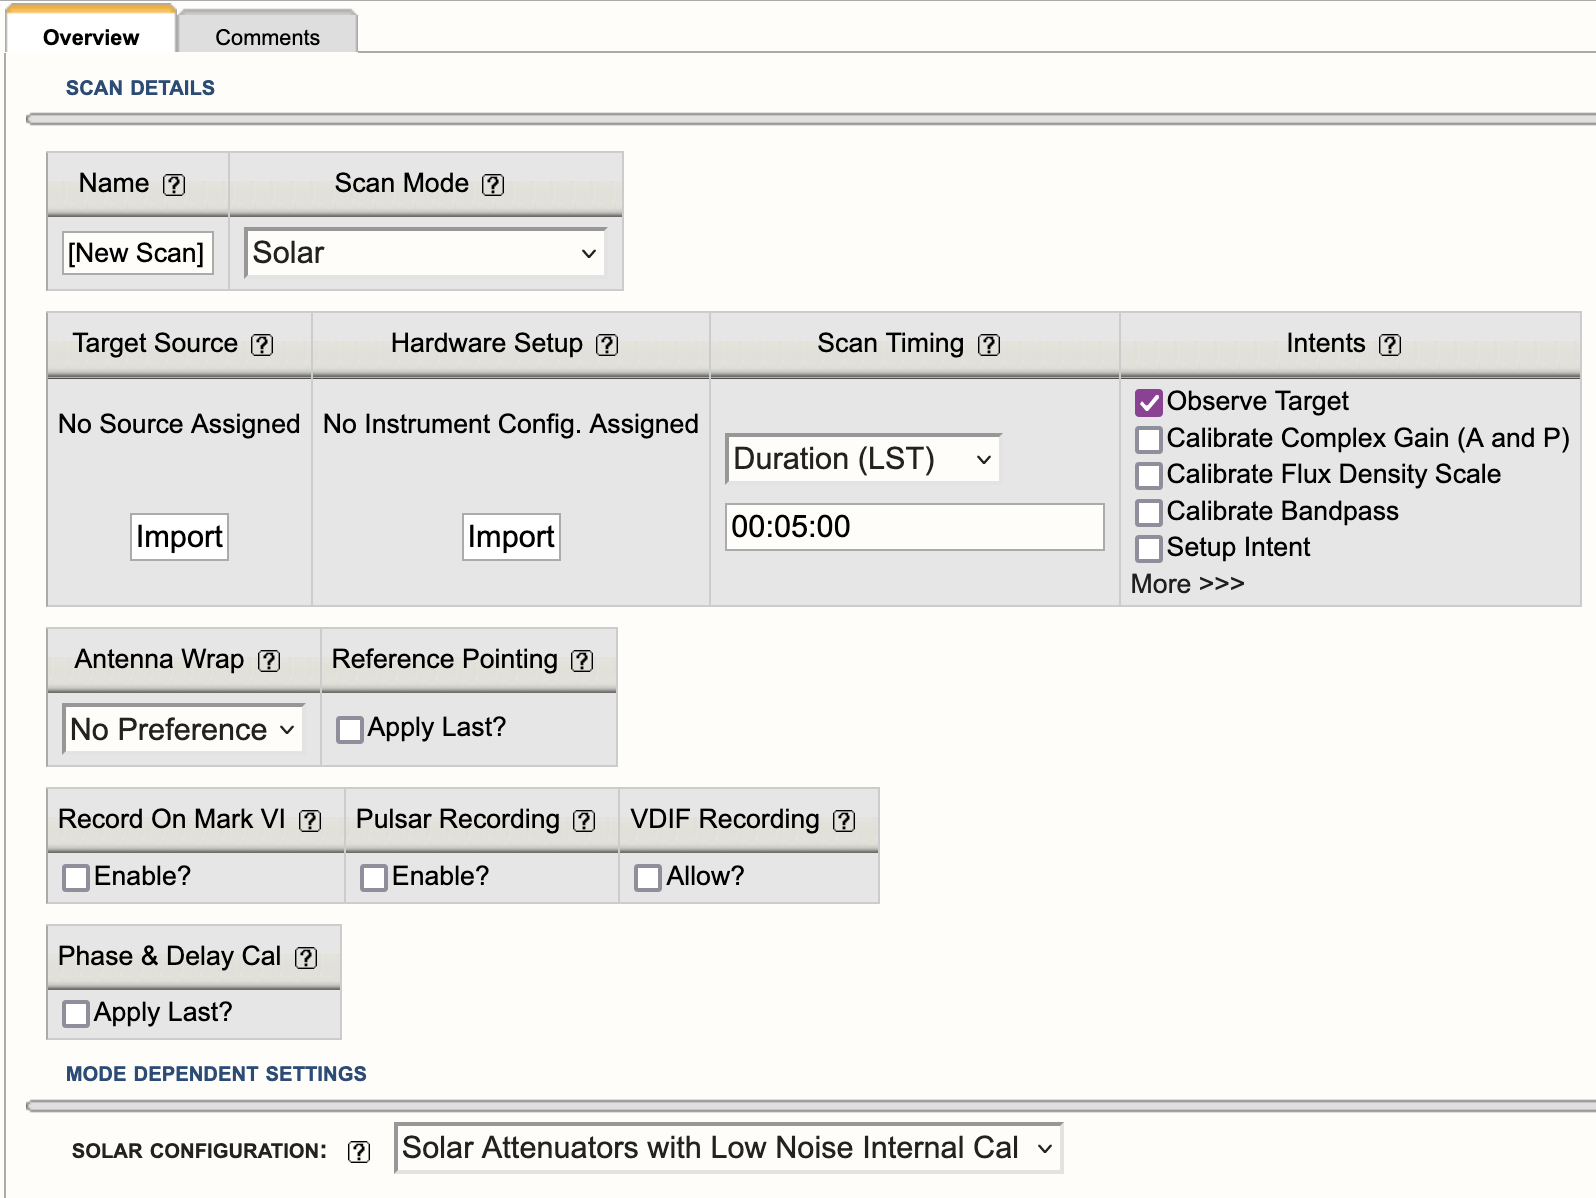
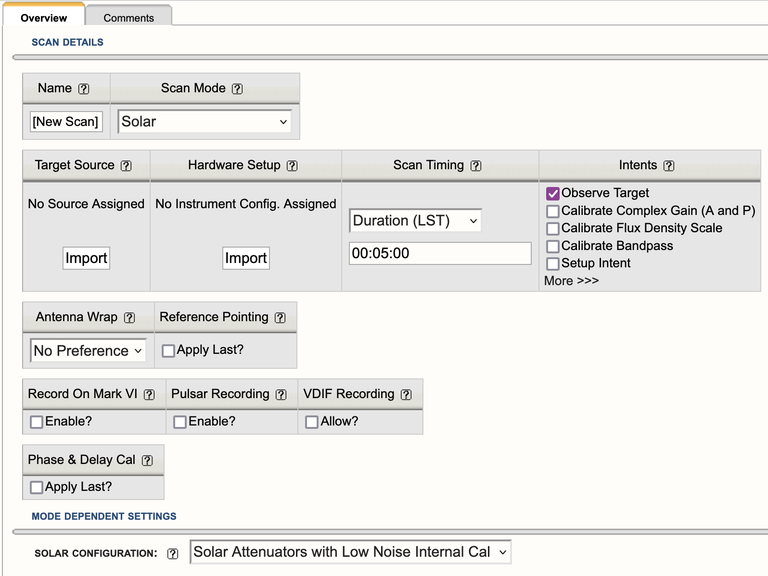
To utilize the solar scan mode, select Solar from the drop-down menu under the scan mode section of a scan (Figure 4.9.4b). This enables an additional pull-down menu at the bottom of the page under Mode Dependent Settings. The table below describes the parameters in detail and which to utilize.
 |
|---|
|
Figure 4.9.4c: Example of a Solar scan mode. |
|
Solar Mode Scan Details |
|
|---|---|
| Target Source |
Import the target position you have defined as a solar source in the SCT. |
| Hardware Setup |
Import a resource in one of the observing bands that are capable of performing solar observations (one of the bands covering 1-18 GHz plus the 230-470 MHz band). |
| Mode Dependent Settings |
Solar Configuration: This setting must be used to insert the special attenuators to ensure that the signal from the Sun is manageable and that appropriate switched cal signals are employed.
|
Pulsar Observing Modes
The VLA supports two different types of pulsar observing:
- Phase-binned imaging mode, in which visibility data are averaged into a number of bins corresponding to different rotational phases of the pulsar. This allows, for example, separate imaging of on-pulse and off-pulse portions of the data.
- Phased-array pulsar mode (also called YUPPI mode), in which antenna data streams are coherently summed in order to produce a high-time-resolution, single-pixel data set. The data can optionally be folded in real-time using a pulse period ephemeris.
Either mode can be configured via the Pulsar tab when creating an instrument configuration in the RCT. For modes that require one, a Tempo-compatible period ephemeris file should be attached to each source in the SCT. Additional information about setting up these modes can be found in the pulsar section of the Observing Guide, and in the OSS pulsar section. If you have questions not addressed in these documents, please contact us through the NRAO Science Helpdesk.
Subarray Observing
The 27 VLA antennas can be used in subsets, to observe several independent programs simultaneously. Typical uses are to observe different sources that are bright enough that not all antennas are needed for the full sensitivity, or observing the same source at different observing bands at exactly the same time.
Subarray Guidelines
When preparing for subarray observing, all procedures, advice, and restrictions to create Scheduling Blocks (SBs) should be followed, as described in the previous sections of the manual. Any source and most resources available in the SCT or RCT catalogs, respectively, can be used in creating scans for the subarray. There are no restrictions in sources, scan intervals, scan timing, pointing scans, etc., between the subarrays other than the general limits, including restrictions for General Observing programs (i.e., up to three independent subarrays using standard 8-bit and 3-bit continuum setups and no special modes such as pulsar, OTF, etc., as that would make it a (Resident) Shared Risk program). There are restrictions in the division of antennas over the subarrays; in particular three subarrays of nine antennas each is not allowed. Further details on using subarrays can be found in the VLA Observing Guide and the Observational Status Summary (OSS).
Summary
- Subarray observing should be proposed for and be approved by the TAC.
- Subarray observing is General Observing and has restrictions accordingly; e.g., only standard observing with 8-bit and/or 3-bit continuum resources from the NRAO default list. Other modes or more than 3 arrays are in the Shared Risk categories.
- A division in three subarrays is typical one of 11, 8 and 8 antennas on the array; a division in two usually has 15 and 12 antennas per subarray allocated. Typical subarray antenna distributions over the whole array are homogeneous, random, or the inner antennas for the higher frequencies in a subarray and the outer for the lower frequency bands in another subarray. The latter is done to attempt to get a similar angular resolution between the observing frequencies.
- Subarrays cannot be generated with text-file uploads of SBs. However, if the Subarray Loop structure is in place, text-file scan lists can be imported in each subarray Loop separately (File → Import Scans...).
We are working on creating the three Reports separately for each Subarray Loop in an update of the OPT, but for now only the Schedule Summary Report (located at the bottom of the Reports tab of an SB) shows independent information per Subarray Loop.
How to Create Subarrays
Currently, creating a subarray schedule in the OPT is implemented by the use of scan loops with different scans (e.g., different sources, or the same sources with differing resources), where the loops are executed at the same time with different subsets of antennas. This is not the optimum implementation and we are working on a better scheme for the future. For the moment please follow these instructions:
- In the Program Block (PB) created for the project and approved for subarray observing, create a Scheduling Block (SB) if it is not already present. The details such as LST start range, weather conditions, count, etc., entered for this SB will apply to all of the subarrays created within the SB.
- To create a subarray in the SB, select the SB and make sure the SB is empty, i.e., no scans, then, select File → Create New → Subarray.
- To create additional subarrays within the same SB, select the newly created Subarray Loop and then select File → Create New → Subarray. Up to three subarrays can be created for General Observing.
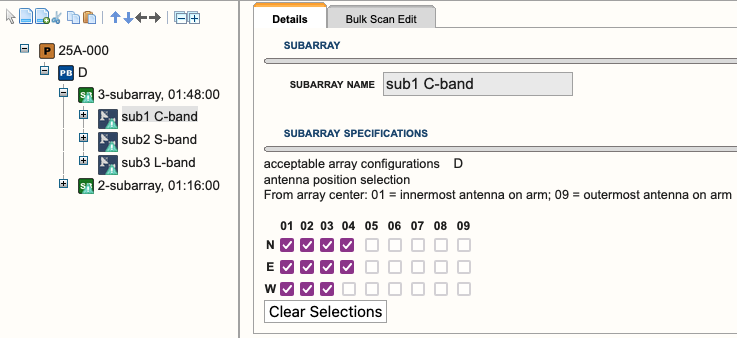
- Divide the array into subarrays, per Subarry Loop (see Figure 4.9.6a).
- Tick the boxes of stations that should make up the subarray configuration.
- Already used antennas should not be selectable. Note that the numbering is from the center of the array (#1) out to the furthest one on the arm (#9), where N, E, and W stand for the North, East, and West arms, respectively. The allocated array configuration is specified in the PB; the actual antenna pad numbers scale with the principal array configurations (Any, A, B, C, D) but the order specified in the Subarray Loop is in which order the antennas are allocated on each arm per subarray.
 |
|---|
|
Figure 4.9.6a: Example of three subarrays under an SB. |
- Create your Scan Lists in each of your subarrays.
- Scan loops are allowed. Copying scans from one subarray to the next should work as usual, etc. However, do not use the tick-box Keep Previous Configuration under the Instrument Configuration for the first scan resource in your subarray. Make sure the total time per Subarray Loop adds to (almost) the same time, as otherwise the shorter subarrays will be idling while the longest has to finish (and which total time will count toward your allocated time).
- Once each Subarray Loop contains valid scans, the Reports page of the SB can be used to generate resource, source, and scan summaries. However, as a WARNING at this time, the Reports summaries include all resources and accumulated time on source over the subarrays. That is, all resources used in any Subarray Loop is listed in a single Resource Summary table. Also, if a source/resource/intent combination appears in more than one Subarray Loop, the total number of scans and total accumulated time is listed in a single Source Summary Table. However, when unfolding the loops in the Scan Listing table, they do list the scan listing per Subarray Loop correctly in the loops, i.e., each loop starts at the same LST to show the scan timings, elevations, etc., of the scans in each subarray. Check the end times of each of the loops to make sure they do not differ too much.
- Validate and submit the SB when done. Be sure to disable COSMIC-SETI. This is necessary only for subarray observations.
VLA + LWA Observing
Disclaimer: Non-standard eLWA observing is currently listed as RSRO (Resident-Shared Risk Observing) and not GO (General Observing). A fixed version of this mode is available as Shared Risk Observing as of semester 2022A and available from the list of default setups, labeled as "eLWA (from semester 22A)". If you have questions regarding eLWA observing, please contact us through the NRAO Science Helpdesk.
VDIF stands for VLBI Data Interchange Format and was introduced in 2009 to standardize data transfer and storage for Very Long Baseline Interferometry (VLBI) observations. The expanded Long Wavelength Array (VLA + LWA = eLWA) observing mode uses this format to record a VDIF data stream for each VLA antenna. The VDIF files are then combined with raw voltage beam data from the New Mexico Long Wavelength Array stations and are correlated offline using a software correlator after the observation is completed.
The Fundamental Steps for Creating an eLWA SB
Step 1: Create VDIF Instrument Setup
First, go to Instrument Configurations (RCT), select the resource catalog you wish to create a new resource, and select FILE → CREATE NEW → 8-BIT INSTRUMENT CONFIGURATION.
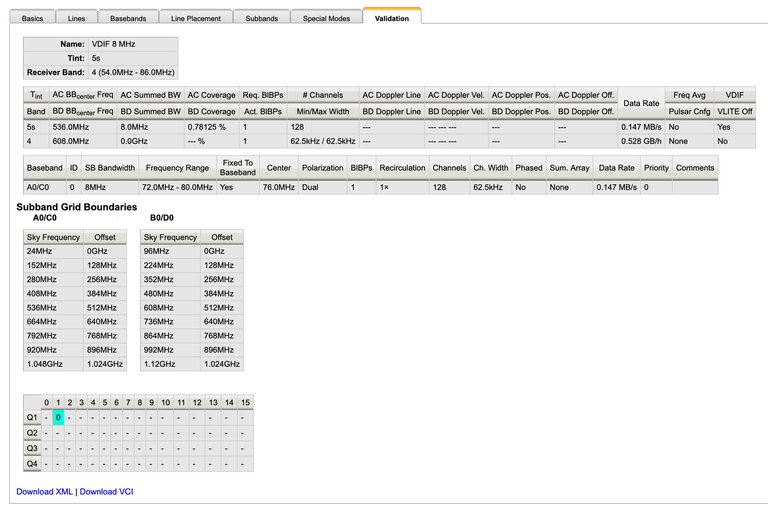
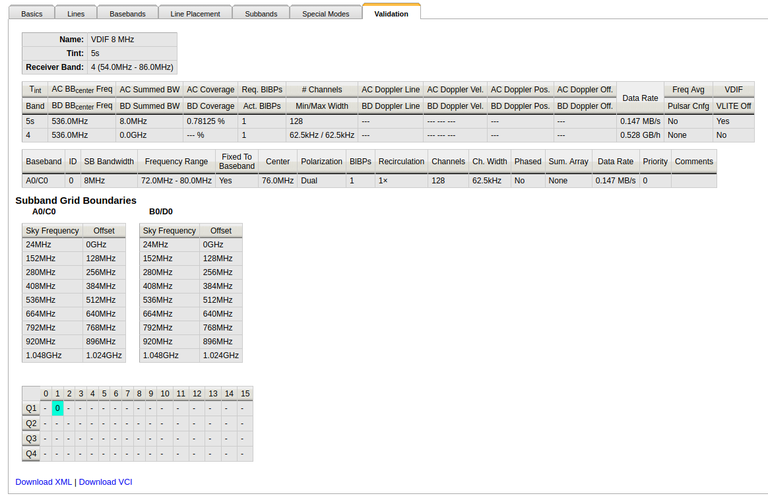
- Basics tab: Give the resource a name, e.g., VDIF 8 MHz, then select the receiver band 4 (54.0 - 86.0 MHz). The correlator integration time in this case is not relevant, just specify 5.0 seconds.
- Basebands tab: Set the center frequencies to 536.0 MHz.
- Subbands tab: Add one subband, select 8 MHz bandwidth, put BB_center-460.0 MHz to set central frequency to 76 MHz, and then set polarization to Dual and Recirculation to 1x.
- Special Modes tab: Select the VDIF tab and select Yes for Recording.
- Validate tab: Make sure the summary looks like Figure 4.9.7a shown below and no validation errors are reported.
 |
|---|
| Figure 4.9.7a: Validation page in the Resource Catalog Tool (RCT) of a valid VDIF resource. |
Step 2: Enable scan for VDIF recording
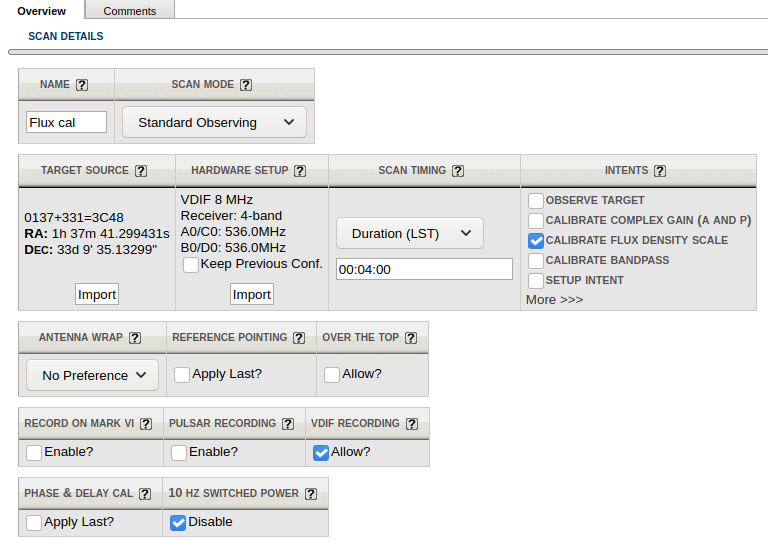
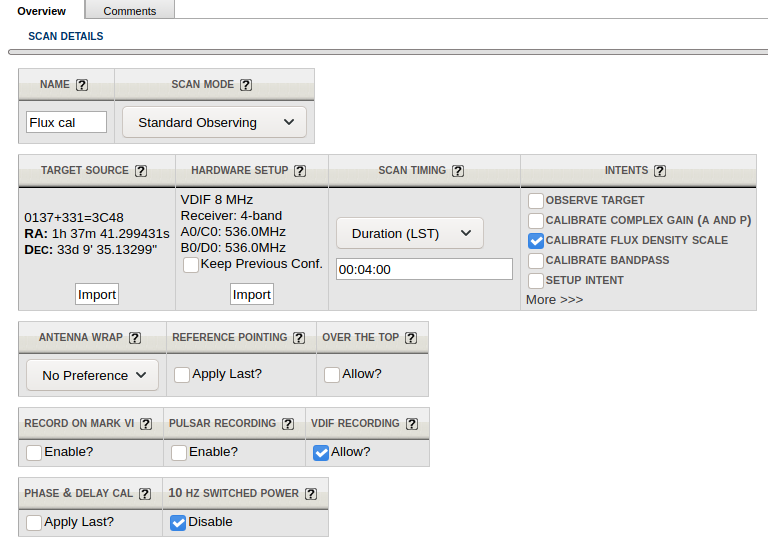
When creating a new scan, select the above created VDIF instrument configuration. In order to enable VDIF recording, you also need to set the checkbox for VDIF Recording within the scan and it is also strongly recommended to disable the 10 Hz switched power, by selecting the Disable checkbox. Your scan should look similar to the example in Figure 4.9.7b below.
 |
|---|
| Figure 4.9.7b: Example of a scan using VDIF recording. |
Important Note: If you plan to trigger resetting requantizers using a setup scan and the VDIF recording instrument configuration, then 10 HZ SWITCHED POWER must be unchecked, to have switched power enabled, and VDIF RECORDING should be disabled by leaving it unchecked.




Connect with NRAO