Modify an SB and Bulk Scan Edit
After you have created an SB, you may want to make some changes (rename, re-order the scans, adjust a loop iteration, change a (re)source, etc.). Changes to an SB may be made at anytime prior to submitting. Once the SB has been submitted you will be required to cancel submission (unsubmit) to make any changes.
Copy/Paste an SB
SBs may be copy and pasted from within a PB, from another PB, or from another project you have access to. Duplicating an SB is useful if you want to re-use the basic structure of an SB, but change the (re)sources or simply change the LST start range and antenna wrap request.
Copy/Paste Procedure:
- Navigate to the PB which contains the SB you wish to copy.
- Select the SB to be copied.
- EDIT → COPY <SB name>
- Either stay in the PB to paste the SB or navigate to a different PB to then paste the SB.
- EDIT → PASTE
- The SB will then be pasted to the end of the list of SBs.
By using the menu strip or the icon menu it is possible to cut (delete), copy, paste, and add any number of individual scans (or scan loops) to any position in the tree at any time. Some other useful icons are the arrows that move a selected scan (or loop) up or down in the current tree (i.e., keeping loops intact as loops), and in or out of a scan loop. Selecting the leftmost arrow  allows to select multiple scans for copy and pasting. Always verify that the scan(s) you moved ended up in the expected location. Note, the leftmost arrow
  will not allow you to cut (delete) a group of scans.
Bulk Scan Edit
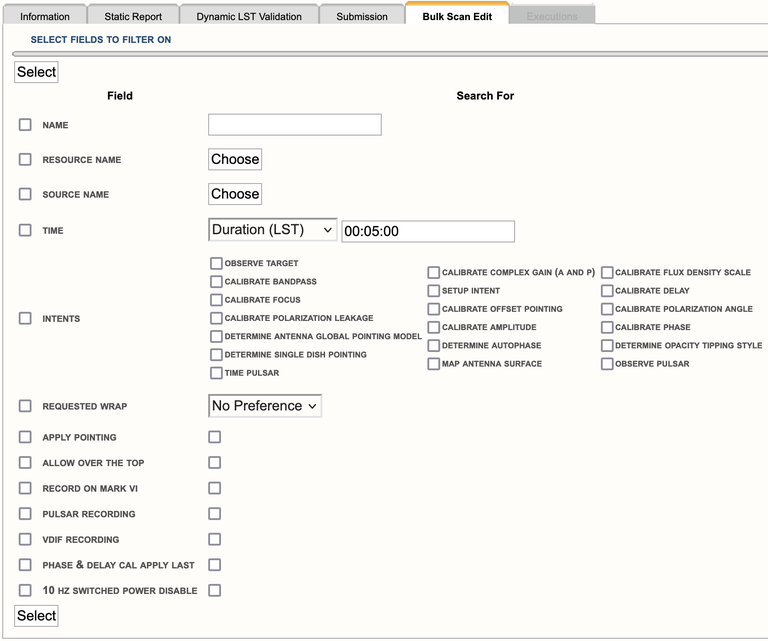
The Bulk Scan Edit tab (Figure 4.6.1) under an SB is utilized for making changes to many scans simultaneously within the selected SB. For example, if a different resource needs to be imported for many scans or perhaps a calibrator needs to be changed or scan intents updated, then the Bulk Scan Edit is the best tool for the task.
Note, scan loops also have a Bulk Scan Edit tab. This is useful if you only want to change the scans within a selected loop. Otherwise, use Bulk Scan Edit at the SB level to update all possible scans throughout the SB.
If the SB or scans were uploaded with a text file, the simplest way to make changes may be to edit the original file and upload that again. Especially if that file is kept as a template or for future reference. Otherwise, you may use the Bulk Scan Edit tab of the SB to specify the parameters to be changed and the new parameters.
 |
|---|
|
Figure 4.6.1: Bulk Scan Edit tab. |
How to Use
When using Bulk Scan Edit, the desired changes will only be made to the selected SB. After completing a bulk scan edit, be sure to double check the changes made to the SB scans under the Static Report tab. The information on the Static Report tab will help you determine if a scan is still using an unintended parameter, i.e., an incorrect (re)source.
General steps on how to use Bulk Scan Edit:
- Check the box next to the Field type, i.e., Name, Resource Name, Source Name, Time, Apply Pointing, Record on Mark V, Allow Over the Top, Request Wrap, or Intents. Note, only one Field type parameter can be changed at a time.
- Search for or choose the current parameter in use, e.g., choose the resource or source you wish to change.
- Click either Select button (at the top or bottom of the page). It will appear as though the Bulk Scan Edit tab has done nothing. On the contrary, it has taken the parameters you have entered and is ready for the next step.
- Re-check the box next to the Field type selected in the first step.
- Search for or choose the new parameter to be applied, e.g., choose the new resource or new source you with to use, then click Ok.
- Click either Update button (at the top or bottom of the page). This will take you to a new page to verify the changes you wish to implement. Note, you may choose the Back button if you selected the incorrect parameter and wish to start over.
- A table will list all scans that use the selected parameter to be changed to the new parameter. You may un-check scans you do not want changed or leave them all selected so all are changed to the new parameter.
- Click on any of the Confirm buttons to update to the new parameter, or click on any of the Back buttons to change your selections.
- After clicking Confirm, the scans that were updated with the new parameter will briefly highlight in the left-hand column of the scan listing. If scans are hidden inside a loop, they will briefly highlight when the loop is expanded with the plus icon.
Example of a Bulk Scan Edit:
This example will step through how to change or import a new resource. This is the most common use case especially for observations using custom resources, i.e., spectral line setup. It is important to note, any changes made to a (re)source in the RCT or SCT do not propagate through to the OPT. The new (re)source must be re-imported into the scans of an SB.
- Check the box next to Resource Name.
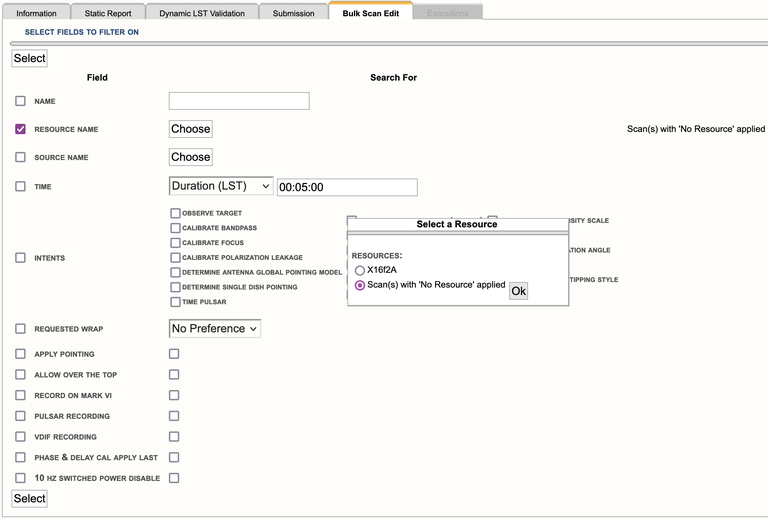
- Click on the Choose button next to the Resource Name. A pop-up box will appear giving you the option to choose the resource you wish to replace or if you have scan(s) without a resource you may select “Scan(s) with “No Resource applied”, then click Ok. (Figure 4.6.2)
- Next, click on either of the Select buttons.
- Re-check the box next to Resource.
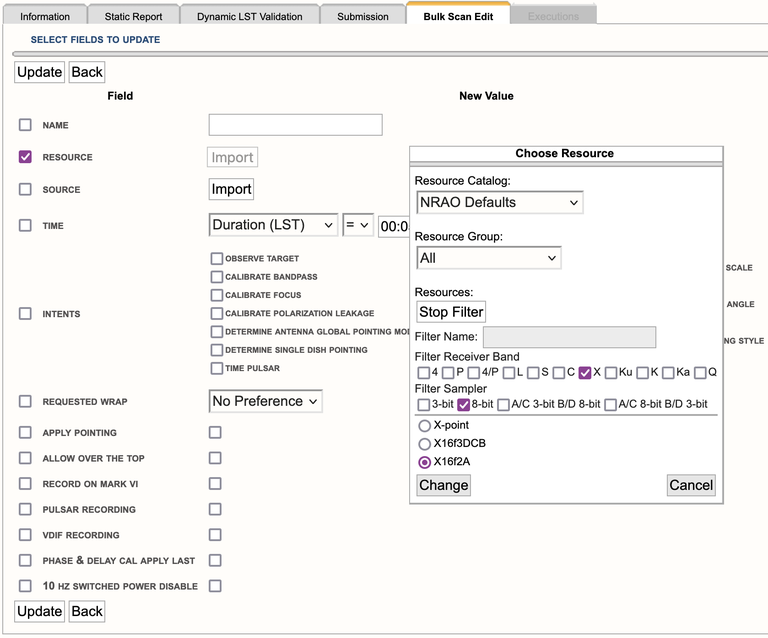
- Click on the Choose button next to Resource. A pop-up box will appear giving you the option to choose a resource catalog (or group), choose the resource you wish to import, and then click Ok. (Figure 4.6.3)
- Click on either Update button.
- Next, a table will list all scans to be updated with the selected resource (Figure 4.6.4).
- Click on any of the Confirm buttons to apply the changes.
 |
|
Figure 4.6.2: Resource selection. |
 |
| Figure 4.6.3: New resource selected. |
 |
| Figure 4.6.4: Scan(s) to be updated. |
Filter Source Search
New with 1.31 is the ability for the user to filter their source search in a source catalog. This can be useful if the source catalog in question has many source entries, such as sources used for a survey. Figure 4.6.5 shows how to activate the Filter search. Figure 4.6.6 shows the parameters available for the Filter. From the top in Figure 4.6.6:
- Source Catalog: the catalog upon which you wish to search
- Source Group: if you have groups in your catalog, you can search them individually or all of them
- Sources - Stop Filter: this will collapse the Filter options
- Name: filter by name of source
- RA: filter by RA position - Reset button resets RA to 0h 00m 0.00s (Note: when entering values you must use units)
- Dec: filter by Dec position - Reset button resets Dec to 0d 00' 0.00" (Note: when entering values you must use units)
- Radius (deg): search radius in degrees based upon RA and/or Dec position - Reset button resets Radius to 1.0d
The search results will appear as a list before the parameters section. Click on the button next to the source and select Change, or Cancel to quit.
| Figure 4.6.5: Activating the Search Filter |
Figure 4.6.6: Search filter options |
Filter Resource Search
Users can filter their resource search in a resource catalog. This can be useful if the resource catalog in question has many resources. Figure 4.6.7 shows how to activate the Filter search. Figure 4.6.8 shows the parameters available for the Filter. Figure 4.6.9 shows what happens when you select a sampler that is not available for the receiver. Figure 4.6.10 shows that you can have multiple bands and/or samplers selected.
Figure 4.6.8 explained:
- Resource Catalog: the catalog upon which you wish to search
- Resource Group: if you have groups in your catalog, you can search them individually or all of them
- Resources - Stop Filter: this will collapse the Filter options
- Name: filter by name of source
- Filter Receiver Bands: filter by receiver band(s)
- Filter Sampler: filter by 3-bit and/or 8-bit samplers
The search results will appear as a list before the parameters section. Click on the button next to the source and select Change, or Cancel to quit.
|
Figure 4.6.7: Activating the Search Filter |
Figure 4.6.8: Search filter options |
|
Figure 4.6.9: Incorrect sampler for receiver band |
Figure 4.6.10: Example of multiband / sampler search results |


Connect with NRAO